
Should You Pressure Wash Your House Before Painting?
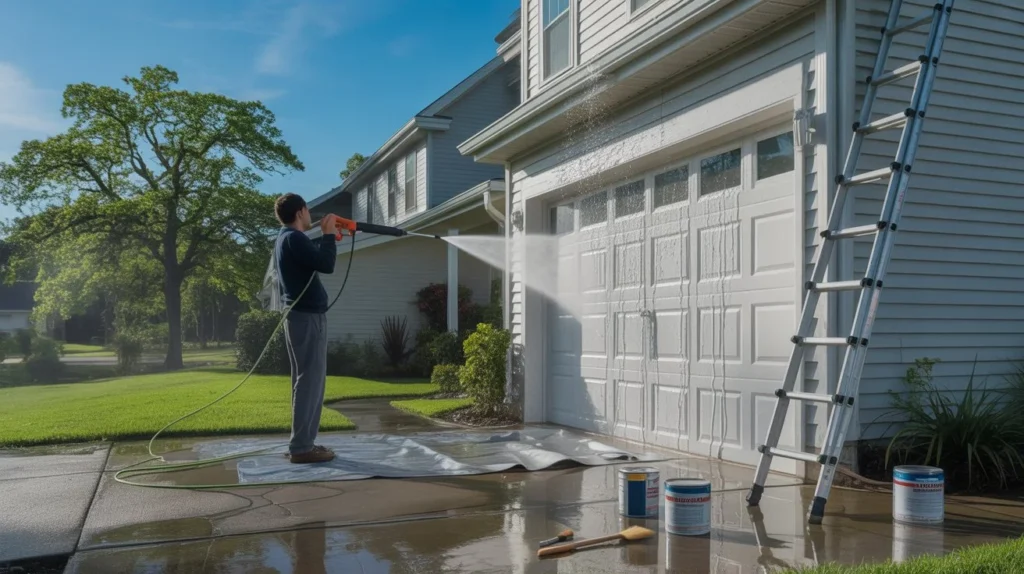
Painting a house without proper prep often leads to peeling, uneven finish, and wasted money. Dirt, dust, and mold block paint from sticking well. Clean surfaces help paint bond better and last longer over time. A quick wash removes layers you cannot see but that affect results. Should You Pressure Wash Your House Before Painting? The short answer is yes for most exterior surfaces that are dirty or exposed. A proper wash improves adhesion and gives a smooth base for paint. In many cases, a clean surface is the difference between a short-term job and a long-lasting finish. Why Pressure Washing Matters Before Painting Pressure washing removes buildup that blocks paint from bonding with the surface. Over time, walls collect dirt, grease, pollen, and mildew. These layers act like a barrier between the paint and the surface. Clean surfaces allow primer and paint to grip better. This reduces peeling and flaking later. It also helps paint spread evenly without patches or streaks. For homeowners looking into house washing services tracy ca, professionals like VJ Pressure Washing use the right methods to prepare surfaces safely. A professional wash ensures consistent cleaning across large areas, which is hard to achieve with DIY tools. Pressure washing also reveals hidden issues. Cracks, loose siding, and damaged areas become visible after cleaning. This allows you to repair problems before painting starts. When You Should Pressure Wash Before Painting You should pressure wash in the following situations: The surface has visible dirt or stains There is mold, mildew, or algae growth The house has not been cleaned in years Old paint is peeling or chalking The home is exposed to dust, traffic, or moisture If you plan to power wash before painting, timing matters. Clean the surface a few days before painting so it dries fully. Fresh cleaning helps primer stick better. It also prevents contaminants from mixing into the paint layer. When Pressure Washing May Not Be Necessary Not every project needs full pressure washing. In some cases, a light clean is enough. You may skip pressure washing when: The surface is newly built and already clean The area was recently washed and maintained You are painting indoors The surface is fragile and could be damaged by water pressure In these cases, a gentle rinse or manual cleaning works better than a full wash. Still, if you are unsure whether to pressure wash before painting, inspect the surface closely. Even light dirt can affect paint adhesion over time. Risks of Pressure Washing Incorrectly Using high pressure without care can cause damage. Common risks include: Water forced behind siding or cracks Wood surface damage or splintering Stripping loose paint layers unevenly Etching softer materials like stucco Incorrect use of a pressure washer can also push moisture into walls. This can lead to mold growth inside the structure. That is why many experts recommend controlled cleaning methods instead of aggressive washing. Choosing the right pressure and nozzle matters as much as the machine itself. Pressure Washing vs Soft Washing Pressure washing uses high force water to remove debris. Soft washing uses low pressure with cleaning solutions. Soft washing is often better for delicate surfaces like: Painted wood Vinyl siding Stucco walls Roof shingles Soft washing cleans deeply without forcing water into surfaces. It is often the preferred method when deciding whether to power wash before painting delicate exteriors. Pressure washing is better for hard surfaces like concrete driveways or brick walls. Choosing the right method depends on the material and its condition. In many home painting projects, a mix of both methods works best. Preparing the House Before Pressure Washing Preparation helps avoid damage and ensures effective cleaning. Before you begin: Close all windows and doors Cover electrical outlets and fixtures Remove outdoor furniture and decor Protect plants with plastic sheets Inspect the surface for cracks or loose parts Also check the weather. Avoid washing before rain or during high humidity. The surface must dry properly before painting. Preparation reduces risks and improves cleaning results. Skipping this step often leads to uneven work or damage. Proper Pressure Washing Techniques Technique plays a major role in results. Start from the top of the house and work downward. This allows dirt and water to flow naturally. Keep these tips in mind: Use a wide spray tip for walls Maintain a steady distance from the surface Move the wand in smooth, overlapping strokes Avoid staying in one spot too long Test pressure on a small area first For most exterior walls, moderate pressure is enough. High pressure should only be used on tough surfaces like concrete. If you are unsure about how to pressure wash before painting, practice on a hidden section first. This helps you avoid mistakes on visible areas. Cleaning Solutions and Detergents Water alone may not remove all contaminants. Cleaning solutions help break down grease, mold, and stains. Use detergents designed for exterior cleaning. Some solutions are made specifically for pre-paint preparation. Apply the solution using a low-pressure setting. Let it sit for a few minutes to loosen dirt. Then rinse thoroughly with clean water. Avoid harsh chemicals that can damage surfaces or affect paint bonding later. Always follow the manufacturer’s instructions. Additional Surface Preparation Steps Pressure washing is only one part of surface prep. After cleaning, additional steps are needed. Scrape off loose or peeling paint Sand rough or uneven areas Fill cracks and holes with filler Apply primer where needed These steps create a smooth base for paint. Even after you power wash before painting, proper surface repair is still required. Skipping these steps can lead to visible defects after painting. Good preparation ensures a clean and durable finish. DIY vs Hiring a Professional You can either do the job yourself or hire a professional service. DIY pressure washing works for small homes or light cleaning. It requires time, equipment, and basic knowledge of pressure settings. Hiring professionals like VJ Pressure Washing offers several benefits: Proper equipment and tools Knowledge of surface types Safe
Do Solar Panels Need to Be Cleaned

Solar panels sit on your roof day and night, exposed to dust, bird droppings, pollen, and pollution. Over time, that grime builds up and quietly steals your energy production. Most homeowners never think about cleaning them until they notice their electricity bill creeping back up. So, do solar panels need to be cleaned? Yes, they do. Skipping it can cost you real money each month. This guide breaks down exactly how often to clean them, the safest way to do it, and when it makes sense to call in a pro. Do Solar Panels Really Need Cleaning? Short answer: yes. Solar panels work by letting sunlight hit the photovoltaic cells beneath the glass surface. When dust, dirt, or bird droppings cover that glass, less light gets through. Less light means less energy produced. Studies from UC San Diego found that soiled solar panels can lose between 15% and 25% of their energy output depending on the level of dirt buildup. In dry, dusty regions like California’s Central Valley, that number can be even higher. If you’re a homeowner in the Stockton or Tracy area, panels can get coated with agricultural dust, pollen, and hard water deposits faster than in wetter climates. That’s exactly why local services like professional solar panel cleaning Tracy CA from VJ Pressure Washing exist to restore your panels to peak performance without risking damage from DIY mistakes. So do you have to clean solar panels? Not every week. But ignoring them entirely is a guaranteed way to lose output and money. What Happens If You Don’t Clean Solar Panels? Dirty panels don’t just look bad. They underperform, sometimes by a wide margin. Here’s what builds up on panels over time: Dust and pollen — fine particles that scatter light instead of letting it pass through Bird droppings — highly acidic and can cause permanent micro-etching on glass Hard water deposits — left behind when sprinklers hit panels, creates a calcium film Soot and smog — common in industrial or high-traffic areas Leaves and debris — can cause shading that affects entire panel strings Each of these layers acts like a thin curtain over your solar cells. You might not notice it right away, but your inverter data will show a slow decline in output. In worst-case scenarios, bird droppings left for months can cause hot spots areas where heat builds up unevenly on a panel. Hot spots can permanently degrade cells and shorten your panel’s lifespan. The financial impact is real. If your system produces 10,000 kWh per year and loses 20% to dirt, that’s 2,000 kWh you’re not getting. At even $0.15 per kWh, that’s $300 a year sitting on your rooftop in the form of grime. How Often Should Solar Panels Be Cleaned? Most experts recommend cleaning solar panels at least once or twice a year. But the right frequency depends on where you live and what’s around you. Here’s a simple guide: Environment Recommended Cleaning Frequency Rainy, mild climate Once a year Dry or dusty area 2–3 times a year Near trees or farmland Every 3–4 months Urban/high-pollution area Every 3–6 months Coastal area (salt air) Every 3–6 months If you live in a place with heavy pollen seasons, you’ll want to schedule a cleaning right after peak pollen months. Same goes for wildfire season ash and smoke residue can settle heavily on panels. The best way to know if your panels need cleaning is to monitor your inverter data. Most modern solar systems come with an app that tracks daily output. If production suddenly drops on a sunny day, dirt is often the culprit. Best Time to Clean Solar Panels Timing matters more than most people think. Early morning or late evening is the best time to clean solar panels. Here’s why: Panels are cool cold water on hot glass can cause thermal shock and cracking The sun isn’t directly hitting the surface, so your cleaning solution won’t dry too fast You’ll get better visual clarity to see streaks or spots Avoid cleaning in the middle of a sunny afternoon. Panels can reach temperatures above 65°C (150°F) in direct sunlight. Spraying cold water on a hot panel is a real risk. Also, clean panels after major weather events. A windstorm, heavy dust day, or wildfire event are all good triggers for a cleaning session. Spring and fall are natural cleaning seasons. Spring handles post-winter grime and pollen. Fall prep cleans off summer dust before low-sun winter months, when every bit of efficiency counts. Safe Ways to Clean Solar Panels Cleaning solar panels isn’t complicated, but doing it wrong can cause damage. Here’s the right approach. What You’ll Need Soft-bristle brush or microfiber cloth Squeegee with a long handle Hose with a gentle spray nozzle Bucket with mild soapy water (dish soap works fine) Deionized or distilled water for the final rinse (avoids hard water spots) Step-by-Step Process Turn off your solar system before you start. Check your inverter’s shutdown procedure. Rinse panels with low-pressure water to remove loose dust and debris. Apply soapy water with a soft brush. Work in sections. Scrub gently never use abrasive pads or steel wool. Rinse thoroughly with clean water to remove all soap residue. Squeegee dry to prevent water spots, especially in hard water areas. What to Avoid High-pressure washers — too much pressure can crack cells or damage seals Abrasive cleaners or scouring pads — they scratch the anti-reflective coating Harsh chemical solvents — they degrade the glass coating over time Standing on the panels — they are not designed to bear weight Should you clean solar panels while they’re mounted at a steep roof angle? In many cases, a long-handled brush and hose from the ground can do the job safely without roof access. Can Rain Clean Solar Panels? Rain helps, but it doesn’t do the full job. Light rain can rinse off loose dust and some pollen. But rain alone can’t remove bird droppings, hard water deposits, or thick layers of grime.