
How to Clean a Dumpster?
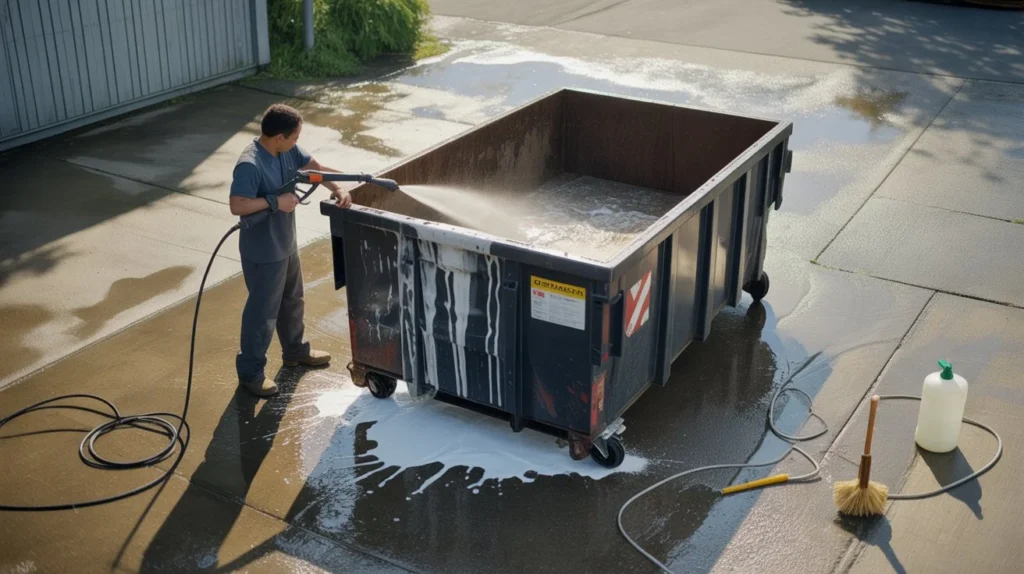
A dirty dumpster is more than an eyesore. It breeds bacteria, attracts pests, and spreads foul odors fast. Whether it’s at your home, business, or rental property, a neglected dumpster becomes a real hygiene problem. Most people ignore it until the smell becomes unbearable or flies start swarming. Knowing how to clean a dumpster properly is the difference between a quick fix and a lasting solution. This guide gives you a clear, step-by-step method using supplies you likely already have, so you can get the job done safely and effectively. Why Dumpsters Get Dirty So Fast Dumpsters take daily abuse. Food waste, liquids, and household trash all mix together in a confined metal space. Heat speeds up bacterial growth. Moisture creates the perfect breeding ground for mold and mildew. Here’s why the buildup happens so fast: Leaking bags leave residue on the bottom and walls Food scraps rot quickly and release gases and liquid Heat in summer months accelerates decomposition Infrequent emptying lets waste sit and bake in the sun Animal access spreads garbage and adds more bacteria A metal dumpster holds heat. That trapped heat turns minor spills into major odor and grime problems within days. Signs Your Dumpster Needs Cleaning Your nose is usually the first alert. But there are other clear signs too. Look for these: A strong, persistent smell even when the dumpster is empty Visible sludge, black residue, or buildup on the interior walls Flies, maggots, or rodents around or inside the dumpster Staining or discoloration on the ground underneath it Mold growth on the walls or lid If you spot any of these, don’t wait. The longer you leave it, the harder it gets to clean. Pro tip from VJ Pressure Washing: If the pad or concrete area around your dumpster is stained and smells as bad as the bin itself, you may need more than a basic rinse. Check out our dumpster pad cleaning companies service page to see how professional cleaning handles the full area, not just the container. Tools and Supplies You’ll Need You don’t need commercial equipment for a basic clean. Here’s what works: For DIY cleaning: Garden hose with a strong spray nozzle (or pressure washer) Long-handled scrub brush Heavy-duty rubber gloves Safety goggles Old clothes you don’t mind ruining Rubber boots Two buckets Drop cloth or tarp (to collect runoff) Cleaning agents: Situation Recommended Cleaner General dirt and grime Dish soap + warm water Grease and oil buildup Degreaser or enzyme cleaner Mold and mildew Diluted bleach solution (1:10 ratio) Heavy odor Baking soda + white vinegar Bacteria and sanitizing Quaternary ammonium disinfectant Avoid mixing bleach with ammonia-based cleaners. It creates toxic fumes. Safety Tips Before Cleaning a Dumpster Dumpster cleaning is a dirty job. Safety first, always. Wear gloves, goggles, and rubber boots every time Never lean into a dumpster without checking for sharp objects first Work in a well-ventilated area Avoid inhaling fumes from cleaning solutions Keep children and pets away during the process Never pour contaminated rinse water directly into a storm drain Where should the wastewater go? This is important. Dirty rinse water from dumpster cleaning contains bacteria, grease, and chemicals. It should go into a sanitary sewer drain, not onto the street or into a garden. If you’re unsure, your local municipality can advise on proper disposal. How to Clean a Dumpster Step by Step This method works for both residential and commercial bins. Follow it in order for the best results. Step 1: Empty the Dumpster Completely Never clean a dumpster that still has trash in it. Schedule your cleaning for the day after a scheduled pickup when the bin is fully empty. Step 2: Remove Loose Debris Scrape out any loose material from the bottom. Use a long-handled scraper or shovel. Bag and dispose of this separately. Step 3: Pre-Rinse with Water Use a garden hose or pressure washer to rinse the interior from top to bottom. This removes loose grime and softens caked-on residue. Hot water works better than cold if you have access to it. Step 4: Apply Your Cleaning Solution Spray or pour your chosen cleaner inside the bin. Use a degreaser for oily buildup or dish soap for general cleaning. Let it sit for 5 to 10 minutes to break down grime. Step 5: Scrub Thoroughly Use a long-handled brush to scrub all interior surfaces: walls, bottom, and the inside of the lid. Pay extra attention to corners where sludge collects. For heavy buildup, a pressure washer with a rotating nozzle makes this step much faster and more effective. Step 6: Rinse Again, Completely Rinse out all soap and loosened grime. Make sure no cleaning solution residue remains. Leftover soap attracts dirt and can cause foam buildup with the next batch of rain or moisture. Step 7: Disinfect and Deodorize Spray the interior with a disinfectant. Let it sit for at least 5 minutes. Then sprinkle baking soda along the bottom before closing the lid. This absorbs future odors between cleanings. Step 8: Clean the Exterior and Lid Don’t stop at the inside. Wipe down the outside walls, the lid, and any handles. Grime on the exterior attracts pests too. Step 9: Allow It to Air Dry Leave the lid open for 30 to 60 minutes to let the interior dry. Closing a wet dumpster traps moisture and encourages mold growth. Best Cleaning Solutions for Dumpsters Not every cleaner is equal. Here’s what actually works for cleaning dumpsters in different conditions. Enzyme-based cleaners are the gold standard. They break down organic waste at a biological level, eliminating odor at the source rather than just masking it. Great for food waste buildup. Degreasers handle oily residue from food scraps, restaurant waste, or automotive use. Apply and let it sit before scrubbing. Diluted bleach (one part bleach to ten parts water) kills mold, mildew, and bacteria. Use it as a final disinfecting rinse. Don’t use it on rubber seals. White vinegar is a safe, natural option for light