
Can You Pressure Wash Tile Grout?
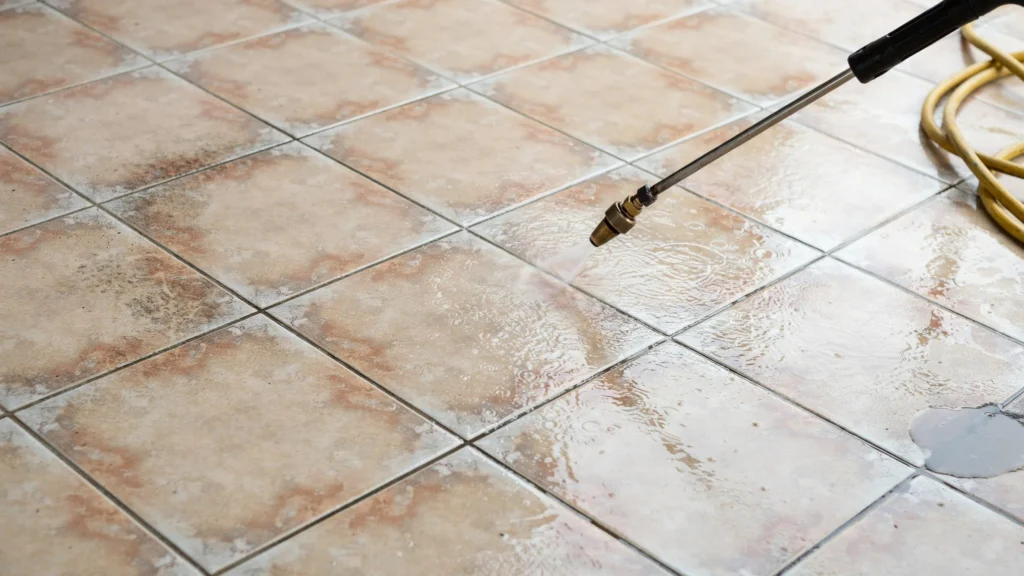
The resilient beauty and easy upkeep of tile floors and walls have made them staples in homes and business buildings. However, it is also true that tiles collect dust and dirt (even the clean and polished ones) due to the existence of lines of grout between them. That’s why so many homeowners are asking, “Is it OK to pressure wash tile grout?” So, the verdict is yes, you can pressure wash tile grout in some cases. With the right equipment, proper technique, and a few safety precautions, you can clean tile and grout without causing damage. Follow these tips to restore your floors to their original appearance with VJ Pressure Washing. Understanding Tile Grout Grout is a filler-type material that is used in the construction industry to fill the gaps between tiles. It secures the tiles and prevents water from running beneath them. Most grout is porous, and dirt, grease, mold, mildew, and other contaminants can get embedded in it over time. And as grout is also more porous than tile, it gets dirty more quickly. Even brooms and mops aren’t enough to clean up that sticky dirt. No wonder so many guys think the best solution is to pressure wash tile grout. Can You Pressure Wash Tile Grout? Yes, having the grout pressure washed is an option, and it’s great for exterior use on: Patios Walkways Pool Decks Outdoor Kitchenettes Garage Floors Entrances Pressure washers use jets of high-pressure water to rapidly remove dirt and grime from the surface of materials, such as grout. When used correctly, they’ll bring the colour of your grout back to life and remove tough stains. Having said that, there is a pressure-washing grout no-no. Water pressure too high can damage aged, cracked, or flaking grout. Check your grout first before performing any work to see if it’s in good shape. How to Clean Grout with a Pressure Washer Many homeowners ask Can you use a pressure washer to clean grout. Instructions along the lines of this could be helpful in achieving the best results. Step 1: Check the Surface Before cleaning the grout lines, inspect the grout lines. Look for: Cracks Missing grout Loose tiles Water damage Before you power wash, fix any damage. Step 2: Dust and Dirt Loosely Be sure to dust or vacuum the tile well. Step 3: Apply a Cleaning Solution A grout-safe cleaner will help break down stains and contaminants. Allow the cleaner to dwell for a few minutes as per the product instructions. Step 4: Set the Correct Pressure For the majority of grout-cleaning jobs: 1200 to 2000 PSI is usually enough. Stay away from very high pressures if not guided by the experts. Beginning with a lower pressure reduces your risk of harm. Step 5: Select the Right Nozzle A wide spray nozzle is usually better for grout. Some common advice is: 25-degree nozzle 40-degree nozzle Keep away from small nozzles that focus too much power on one spot. Step 6: Keep Away Hold the spray wand a few inches away from the surface. “If you spin too close, you can damage the tile and grout.” Step 7: Clean Organized Work in small batches. Spray evenly along the lines of grout, but do not stay too long in one place. Step 8: Rinse Well After cleaning, wash away all remaining dirt and solution. Step 9: Machine Dry Let the surface dry for evaluation. The Best Way to Clean Tile Grout Many homeowners ask about how to clean grout in tile. There’s no question that pressure washing can work wonders, but what is the best method will vary with the circumstance. Indoor Tile Grout Cleansers For indoor use only: Steam Cleaning Grout brushes Mild cleaning solutions These treatments are generally very effective and will not make things too wet. Grout for Outdoor Tile In outdoor applications, tile grout is often subjected to pressure washing, which is among the most effective tile grout cleaning solutions, as it allows you to cover large areas and remove deeply ingrained grime. Combination Approach Many professionals recommend: Applying a cleaning solution. Let it dwell. Power washing the grout. Follow with the grout sealer. This method delivers deep cleaning and durable protection. Grout Cleaning Pressure Washer Tips This professional grout cleaning pressure washer advice can help you get better results. Learn more about our professional house washing Tracy ca services for a cleaner, better-looking property. 1. Start Low and Titrate Up Begin with low pressure and increase if needed. 2. Test a Small Area First Before cleaning the whole area, do a rinse test on a small, hidden area. 3. Keep a Consistent Motion Don’t Concentrate Water in One Place. 4. Clean Along the Lines Cleaning “with the grain” (following grout lines) is more effective too. It is cleaner! 5. Use the Right Cleaning Solutions Professional-grade grout cleaners will make a huge difference in the cleaning results. 6. Wear Protective Equipment Safety glasses, gloves, and rubber-soled shoes provide some protection against mishaps. Conclusion So can you pressure clean tile grout? Usually the answer is yes. Pressure washing can be used to clean grout lines (on any surface really, especially on outdoor tiled areas); it can be extremely useful for removing dirt, stains, mold, and grime from surfaces. How to Clean Grout With a Pressure Washer: Using the right pressure and technique can make dirty grout look like new. For safe, professional results, contact us today for expert grout and tile cleaning services. FAQs Can you pressure wash indoor tile grout? It is not recommended for most indoor surfaces. Indoor grout is usually thinner and more delicate. The water can seep under tiles and cause water damage to the subfloor. Stick to steam cleaning, grout brushes, or mild cleaning solutions for indoor tile grout. What PSI is safe for pressure washing grout? 1200 to 2000 PSI is safe for most grout-cleaning jobs. Starting at the lower end and increasing only if needed reduces the risk of damaging the grout. Avoid going above 2000
Can I Clean My Driveway With Bleach? 5 Things You Must Know First
Your driveway collects dirt, mold, algae, and stains over time. It starts looking dull, green, or spotted. Many homeowners reach for bleach because it’s cheap, easy to find, and strong. And yes, it works on certain stains fast. So, can I clean my driveway with bleach? Yes, you can. But it’s not always the best choice. Bleach removes mold, mildew, and algae well. However, it can damage plants, harm pets, and even discolor some surfaces if used wrong. This guide covers everything you need to know before you grab that bottle. What Does Bleach Do on a Driveway? Bleach is a powerful disinfectant. The active ingredient is sodium hypochlorite. When you apply it to a driveway, it breaks down organic matter like mold, algae, and mildew at the root level. On concrete, bleach penetrates the pores. It kills the organisms causing those dark green or black stains. It also brightens the concrete surface and removes light discoloration. But bleach is a chemical. It reacts with different materials in different ways. On porous concrete, it can leave white residue if not rinsed well. On colored or stamped concrete, it may cause fading. On asphalt, bleach can break down the binder over time, leading to cracks. The bottom line: Bleach is effective on organic stains. It’s not a universal driveway cleaner. Benefits of Cleaning a Driveway With Bleach Here’s why many homeowners choose bleach for driveway cleaning: 1. It Kills Mold and Mildew Fast Bleach doesn’t just clean the surface. It kills the spores beneath. That means mold takes longer to return compared to just scrubbing with water. 2. It’s Affordable A bottle of household bleach costs under $5. You likely already have it at home. For concrete cleaning with bleach, the cost is much lower than hiring a service for minor organic staining. 3. It Brightens Concrete Bleach has mild whitening properties. It can restore the original color of concrete driveways that have gone dull from algae growth. 4. It Works Without a Pressure Washer You don’t need special equipment. A garden sprayer, stiff brush, and garden hose are enough for basic bleach driveway cleaning. 5. It Removes Algae in Shady Spots Shaded driveways grow algae fast. Bleach is one of the most effective ways to treat this without repeated scrubbing. Potential Risks of Using Bleach on a Driveway Bleach has real downsides. Before you start, understand these risks. 1. It Can Kill Your Plants Bleach runoff is toxic to grass, shrubs, and flowers. If your driveway is near a garden or lawn, the runoff can cause yellowing or plant death. 2. It Can Harm Pets and Children Bleach residue stays on surfaces. Pets that walk on it and then lick their paws can get sick. Always rinse the area well and keep kids and animals away until it’s dry. 3. It Can Damage Colored Concrete If your driveway is stamped or colored, bleach may strip the pigment. Always test a small, hidden area first. 4. It Creates Toxic Fumes When Mixed Never mix bleach with ammonia, vinegar, or other cleaners. The reaction creates chlorine gas, which is dangerous to breathe. 5. It’s Not Safe for Asphalt Driveways Bleach degrades asphalt. It breaks down the oils that hold asphalt together. For asphalt, skip bleach and use a dedicated asphalt cleaner instead. 6. It Doesn’t Remove Oil Stains Bleach is an oxidizer, not a degreaser. It won’t touch motor oil, grease, or fuel stains. You need a degreaser or poultice for those. How to Clean a Driveway With Bleach Safely Follow these steps to clean your driveway safely and effectively. What you’ll need: Household bleach (sodium hypochlorite, 5–6%) Water Garden sprayer or bucket Stiff-bristle brush Garden hose Rubber gloves and eye protection Old clothes (bleach stains fabric) Step 1: Clear the Area Remove cars, toys, potted plants, and anything else from the driveway. Rinse nearby plants with water first to protect them from runoff. Step 2: Mix the Bleach Solution For most driveway stains, mix one part bleach with three parts water. For heavy mold or mildew, you can use a stronger ratio of 1:1. Don’t use bleach undiluted. Step 3: Wet the Surface First Lightly rinse the driveway with water. This helps the bleach spread evenly and prevents it from soaking in too fast. Step 4: Apply the Solution Use a garden sprayer or pour from a bucket. Cover the stained areas. Let it sit for 10 to 15 minutes. Don’t let it dry on the surface. Step 5: Scrub With a Stiff Brush Work the solution into the concrete using a stiff-bristle brush. Focus on areas with visible mold, algae, or discoloration. Step 6: Rinse Thoroughly Rinse the entire driveway with a garden hose. Use plenty of water. Rinse toward a drain, not toward your lawn or garden. Step 7: Repeat if Needed For stubborn stains, let the driveway dry and repeat the process once more. Safety note: Always wear gloves and eye protection. Work in a well-ventilated area. Don’t spray on windy days. What Bleach Can and Cannot Remove Not every driveway stain responds to bleach. Here’s a quick breakdown. Stain Type Bleach Effective? Mold and mildew Yes Algae and green growth Yes Dirt and general grime Partially Oil and grease No Rust stains No Paint spills Partially Tire marks No Tree sap No For oil, grease, and tire marks, you need a degreaser or alkaline cleaner. For rust stains, use an oxalic acid-based product. Bleach alone won’t fix those. Alternatives to Bleach for Driveway Cleaning If bleach isn’t right for your situation, here are better options. 1. Oxygen Bleach (Sodium Percarbonate) This is a safer alternative to chlorine bleach. It’s gentler on plants and pets. It still removes mold and algae but breaks down into water and oxygen. Brands like OxiClean work well for concrete cleaning. 2. Baking Soda and Dish Soap For light stains, a paste of baking soda and dish soap scrubbed into the surface works without any harsh chemicals. 3. White Vinegar Vinegar is