
How to Clean Solar PanelsHow to Clean Solar Panels the Right Way (Step-by-Step Guide)
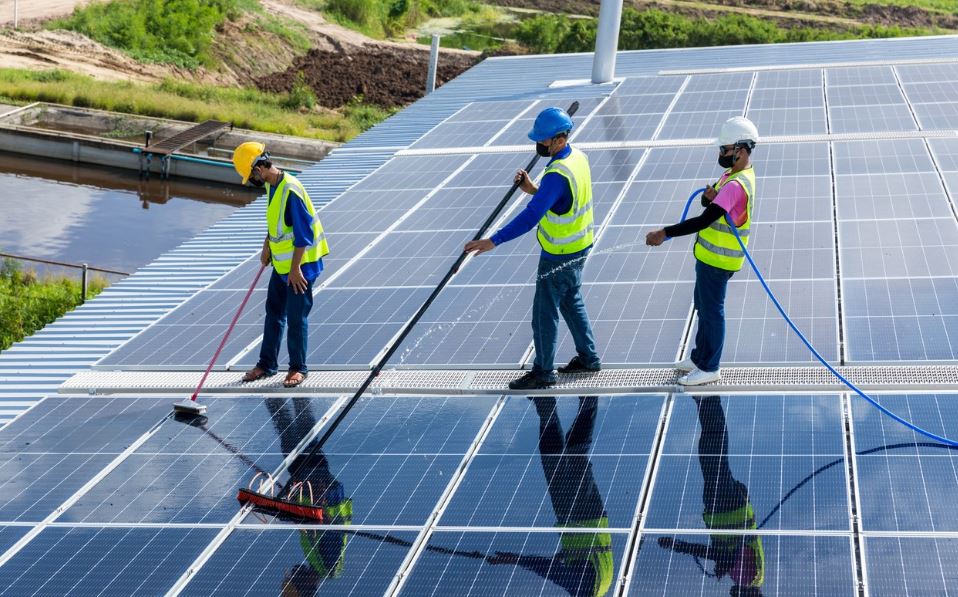
Dirty solar panels lose power. Dust, bird droppings, and pollen block sunlight from reaching the cells. That alone can cut your system’s output by 15% to 25%. You paid good money for solar, so keeping those panels clean is one of the easiest ways to protect your investment. Learning how to clean solar panels doesn’t take much. You need the right tools, the right time of day, and a safe method. This guide covers everything, from basic DIY cleaning to knowing when it’s time to call a pro. Why Cleaning Solar Panels Is Important Solar panels work by turning sunlight into electricity. When a layer of dirt sits on top of the glass, less light gets through. Less light means less power. Here is what buildup does to your system over time: Dust and pollen form a thin film that reduces light absorption. Bird droppings cause “hot spots,” which can permanently damage cells. Leaves and debris block large sections and create uneven shading. Hard water deposits leave mineral stains that get worse if ignored. A clean panel can produce 15% to 25% more energy than a dirty one. In a year, that adds up to real money. Good solar panel maintenance pays for itself. How Often Should You Clean Solar Panels? There’s no single answer. It depends on where you live and what’s around you. General rule: Clean your panels 2 to 4 times a year. But adjust based on your situation: Dusty or dry climates: Every 1 to 2 months. Places like California deserts or areas near farms get heavy dust buildup. Urban areas: Every 2 to 3 months. City pollution and soot coat panels faster than you’d think. Rainy climates: 2 times a year may be enough. Rain handles light dust well. Near trees or birds: Clean more often. Sap and droppings are stubborn. Most solar manufacturers recommend a professional inspection once a year along with regular cleaning. That keeps your warranty intact and your system running well. Signs Your Solar Panels Need Cleaning Your panels often tell you when they’re dirty. You just have to know what to look for. Watch for these signs: Your energy bill goes up but your usage doesn’t change. Your solar monitoring app shows a drop in production. You can visibly see dust, streaks, or bird droppings from the ground. Dark patches or shadows appear on the panels. It hasn’t rained in several weeks. If you notice a sudden drop in power output and live in an area with heavy bird activity or pollen, that’s usually the first clue. Don’t wait for it to get worse. If you’re unsure whether your panels need a basic rinse or a deep clean, a local specialist can assess them quickly. VJ Pressure Washing offers professional solar panel cleaning in Tracy, CA, and can spot damage, buildup, and shading issues most homeowners miss. Getting a professional set of eyes on your system once a year is smart solar panel maintenance. Tools and Supplies Needed to Clean Solar Panels You don’t need anything fancy. Most of what you need is probably already at home. Basic DIY solar panel cleaning kit: Soft-bristle brush or a solar panel cleaning brush (long handle preferred) A garden hose with a gentle spray nozzle A squeegee with a soft rubber edge A bucket of warm water A few drops of mild dish soap (optional, for stubborn grime) Microfiber cloths for drying edges Optional but helpful: Extendable pole so you can reach panels from the ground Deionized water system (removes mineral deposits better than tap water) Safety harness if you must go on the roof Keep everything soft. Solar panel glass is strong but can scratch if you use anything abrasive. What Not to Use on Solar Panels Some cleaning products and tools cause more harm than good. Avoid these: Pressure washers: High-pressure water can crack seals, loosen frames, and void your warranty. This is one of the most common mistakes in DIY solar panel cleaning. Abrasive scrubbers or steel wool: These scratch the anti-reflective coating on the glass. Harsh chemicals or bleach: They degrade the surface over time and leave residue. Tap water in hard water areas: Minerals in tap water leave white spots after drying. Use filtered or deionized water if possible. Detergents with strong fragrances or degreasers: These are too aggressive for panel surfaces. Stick to soft materials and plain water whenever you can. Less is more when it comes to solar panel maintenance. Step-by-Step Guide to Cleaning Solar Panels This is the safest and most effective way to clean your panels without damaging them. At VJ Pressure Washing, we follow this exact process on every job to make sure your panels stay protected and performing at their best. Step 1: Pick the Right Time Clean early in the morning or late in the evening. Panels get very hot during the day. Cold water on a hot panel can cause thermal shock and micro-cracks. Morning is best because dew softens dirt overnight. Step 2: Turn Off Your Solar System Before touching anything, shut down the system using the manufacturer’s shutdown procedure. Check your inverter manual or app for instructions. Safety first. Step 3: Remove Loose Debris First Use a soft dry brush or cloth to sweep off leaves, dust, and loose dirt. Start from the top and work down. Don’t press hard. Step 4: Rinse With Water Use a garden hose in a gentle setting. Rinse from top to bottom. This removes most surface dust without any scrubbing. Step 5: Gently Scrub Stubborn Spots Mix a few drops of mild dish soap in a bucket of warm water. Dip your soft brush and gently scrub any bird droppings or stuck-on grime. Don’t scrub in circles. Use straight strokes. Step 6: Rinse Again Do a final rinse to remove all soap. Soap residue attracts more dirt, so make sure it’s all gone. Step 7: Dry the Edges Use a clean microfiber cloth or squeegee to dry the edges and frame.
How to Install Gutter Guards

Clogged gutters cause real damage. Water overflows, rot sets in, and your foundation suffers. The fix is simpler than most people think. Gutter guards block debris before it builds up, saving you hours of cleaning and hundreds in repair costs. They work on almost every home and most types are made for DIY installation. So if you want to know how to install gutter guards without hiring someone, you’re in the right place. This guide walks you through every step, from picking the right type to finishing the job safely. No experience needed. Types of Gutter Guards Before you buy anything, know what’s out there. Not all gutter guards are equal. The right type depends on your roof, tree coverage, and budget. 1. Mesh Gutter Guards These are the most popular. A fine metal mesh sits over your gutter and blocks leaves, pine needles, and shingle grit. Water flows through easily. They work great in areas with heavy tree coverage. 2. Micro-Mesh Gutter Guards Even finer than standard mesh. These block tiny debris like seed pods and roof sand. They cost more but offer the best performance in most climates. 3. Reverse Curve (Surface Tension) Guards Water clings to the curved surface and drops into the gutter. Leaves fall off the edge. These are effective but can be tricky to install correctly. 4. Foam Gutter Guards Foam inserts sit inside the gutter. Water soaks through. Debris sits on top and dries out. Easy to install, but foam can harbor mold and algae over time. 5. Brush Gutter Guards Cylindrical brushes fit inside gutters. Leaves rest on top and blow away. Simple to put in but require frequent cleaning of the brushes themselves. 6. Screen Gutter Guards Flat screens that snap over gutters. Very affordable and easy to install. Best for areas with large leaf debris, not pine needles. Quick Tip: If you have large trees near your roof, go with a micro-mesh. If your area gets mostly large leaves, basic screen guards work fine. Tools and Materials Needed You don’t need a lot of gear. Here’s what to gather before you start: Tools: Ladder (extension ladder or step ladder depending on roof height) Tape measure Tin snips or utility knife Work gloves Safety glasses Drill (for screw-on guard types) Garden hose (for testing water flow) Materials: Gutter guards (enough to cover your total gutter length measure first) Screws or clips (often included with the guards) Caulk or gutter sealant (for any leaky joints found during prep) Gutter spikes or hangers (if your gutters need resetting) How Much to Buy: Measure the total linear footage of all your gutters. Add 10% for cuts and overlap. Most gutter guard panels come in 4-foot sections. Preparation Before Installation Skipping prep is the number one reason gutter guard installation fails. Take your time here. Step 1: Clean the Gutters First This is non-negotiable. Any debris left inside will clog your new guards from below. Use a gutter scoop or your gloved hands to clear everything out. Flush with a garden hose. Check that water flows freely to the downspout. Step 2: Inspect for Damage Look for sagging gutters, rust spots, separated joints, or loose hangers. Fix all of these before installing guards. Guards installed on damaged gutters will fail fast. Step 3: Check Gutter Pitch Water needs to slope toward the downspout. The correct pitch is about 1/4 inch of drop for every 10 feet of gutter. Use a level to check. Re-hang any sections that are sagging or pitched the wrong way. Step 4: Seal Any Leaks Apply gutter sealant to any joints or seams that drip. Let it cure fully before moving to installation. Thinking about skipping all this and just having someone do it right? If you’re in Northern California, check out the best gutter guard installers in Tracy, CA at VJ Pressure Washing. They handle cleaning, inspection, and full gutter guard installation in one visit. Step-by-Step Installation Process This is the core of how to install gutter guards. Follow each step in order. Step 1: Measure and Cut Your Guards Lay your first gutter guard panel next to the gutter section you’re starting with. Use tin snips or a utility knife to cut it to length. Always wear gloves — cut metal edges are sharp. For corners, miter-cut the panels at 45 degrees so they meet cleanly. Step 2: Position the First Panel Slide one edge of the guard under the first row of roof shingles. This tucks the guard in place and creates a solid anchor point. Don’t lift or bend shingles aggressively — just slide under them gently. Step 3: Clip or Screw Into Place Most guards clip onto the outer lip of the gutter. Press down firmly until you hear or feel the clip snap. For screw-type guards, pre-drill pilot holes and fasten with the included screws. Don’t overtighten — you can crack plastic guards. Step 4: Continue Down the Gutter Work from one end to the other. Overlap each panel slightly — about half an inch — to prevent gaps. Gaps let debris in and defeat the purpose of the guard. Step 5: Handle Downspout Areas When you reach a downspout opening, cut your panel to stop just before it. Don’t cover the downspout entry. Water needs a clear path to drain. Some systems include a specific downspout cover — install it per the manufacturer’s instructions. Step 6: Check Your Work Walk along the roofline and press on each panel. It should feel solid, not wobbly. Check that no panels are sticking up higher than the roofline — this can cause water to overshoot the gutter in heavy rain. Step 7: Test With Water Use a garden hose to run water along the full length of the gutter. Watch for overflow, pooling on top of the guards, or water escaping at joints. Adjust any problem panels immediately. How to Install Gutter Guards on Different Gutter Types Not all gutters are the same. Here’s a quick