
How to Clean Windows: A Complete Step-by-Step Guide
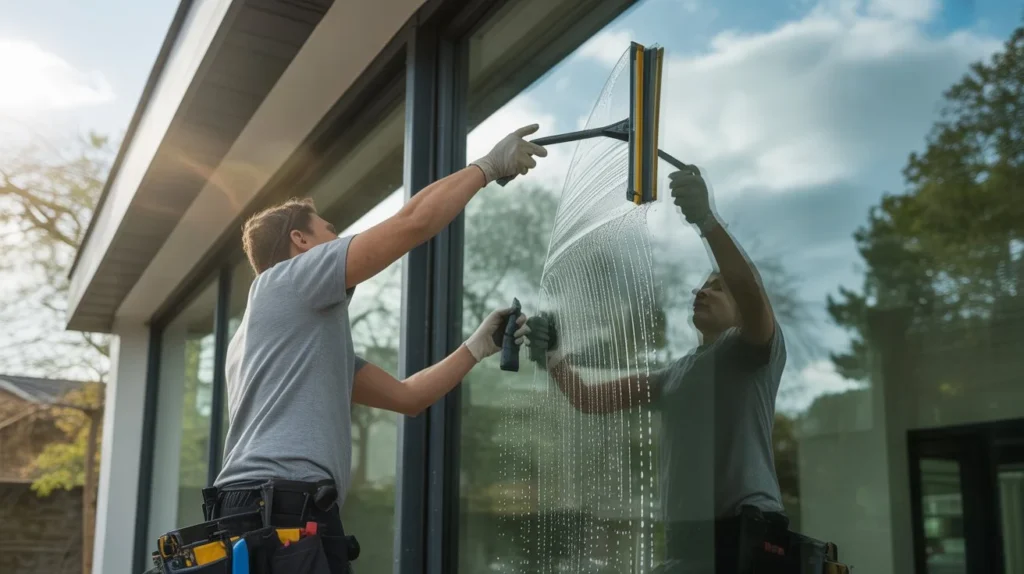
Dirty windows do more than look bad. They block natural light, leave mineral deposits that etch glass over time, and make even a clean home feel dull. Most people wipe them down and still end up with streaks. The problem is usually technique, not effort. Knowing how to clean windows the right way saves you time and gives you results that actually last. This guide covers every step, from the right tools to streak-free technique, so you get crystal-clear glass every single time. Why Clean Windows Regularly? Most homeowners clean windows once a year if at all. That is not enough. Dirt, pollen, hard water, and pollution build up on glass over time. Left too long, mineral deposits from sprinklers or rain can etch into the surface permanently. At that point, no amount of cleaning fixes it. Regular cleaning also protects your window frames and seals. Dirt that sits in frame corners traps moisture, which leads to rot on wood frames and mold on rubber seals. Beyond protection, clean windows make a real difference in how your home feels. More light comes through, rooms look bigger, and the view outside is actually enjoyable. Tools and Supplies You’ll Need Using the wrong tools is the number one reason people end up with streaks. Skip the paper towels and old rags. What you need: A good squeegee (10 to 14 inches for standard windows) A scrubber sleeve or applicator wand Two buckets (one for solution, one for rinsing) Dish soap or a dedicated window cleaning solution Microfiber cloths or a lint-free chamois A soft-bristle brush for frames and tracks A spray bottle for spot cleaning A ladder for upper-floor windows Rubber gloves Optional but helpful: A window cleaning extension pole for high windows A water-fed pole system for exterior second-story glass A detail brush for corners and edges Avoid newspapers. It used to work when ink was oil-based. Modern newspaper ink smears on glass. Preparing Your Windows for Cleaning Jumping straight to scrubbing is a mistake. A little prep makes the whole job faster and cleaner. At VJ Pressure Washing, we always start with a full prep check before touching the glass. It is a small step that makes a big difference in the final result. Remove dust and loose debris first. Use a dry microfiber cloth or a soft brush to wipe down the glass, frame, and surrounding wall. Wet cleaning over dry dust turns it into mud. Check the weather. The best way to clean windows is on a cloudy day. Direct sunlight dries your cleaning solution before you can squeegee it off, leaving streaks baked into the glass. Protect your floors and sills. Lay an old towel on the sill and floor below the interior windows. Cleaning solution drips, and it leaves marks on wood or tile if left to dry. Remove window screens. Take screens out before cleaning the glass. Clean them separately. Screens left in place block your squeegee path and trap dirty water against the glass. Step-by-Step Guide to Cleaning Windows This is the core of how to clean windows properly. Follow each step in order. Step 1: Mix Your Cleaning Solution Fill a bucket with warm water. Add a few drops of dish soap. That is it. You do not need expensive cleaners for most windows. For heavy grease or hard water stains, add a small amount of white vinegar to the mix. Step 2: Wet the Glass Dip your scrubber sleeve into the solution. Wring it out slightly so it is wet but not dripping. Apply it to the entire glass surface using horizontal strokes. Work from top to bottom. For exterior windows with heavy buildup, let the solution sit for 30 seconds before scrubbing. This softens the grime and makes it easier to remove. Step 3: Scrub Stubborn Spots Use a non-scratch scrubbing pad for any stuck-on debris, bird droppings, or sap. A razor blade scraper held at a 45-degree angle works well on paint specks or hard water deposits. Always keep the glass wet when using a scraper to avoid scratching. Step 4: Squeegee from Top to Bottom Start at the top corner of the glass. Pull the squeegee across in a single smooth stroke. Wipe the blade with a clean cloth after each pass. Overlap each stroke slightly to avoid leaving lines. For tall windows, do horizontal passes across the top half, then finish the bottom with vertical strokes. This is the technique professional window cleaning crews use to avoid drips on already-clean sections. Step 5: Wipe the Edges Use a dry microfiber cloth to wipe any water left along the edges and corners of the glass. This is where streaks usually form. A clean, dry edge is the difference between good and perfect results. Step 6: Buff if Needed If you spot a streak after the glass dries, buff it out with a dry microfiber cloth using small circular motions. Do not re-wet the glass. Dry buffing removes light streaks without starting over. How to Clean Window Screens Screens collect dust, pollen, and pollution faster than the glass itself. Cleaning them separately gives you much better results. Remove the screen from the window frame. Most screens lift out or have small tabs you press to release them. Rinse with a garden hose on a low setting. High pressure pushes dirt through the mesh rather than washing it off. Scrub gently with a soft brush dipped in warm soapy water. Work in small circles across the entire screen. Pay attention to the frame edges where dirt collects most. Rinse again until the water runs clear. Shake off excess water and stand the screen upright to air dry completely before reinstalling. Never reinstall a wet screen. Moisture trapped between the screen and glass causes water spots. For large homes with many screens or screens that have not been cleaned in years, professional window cleaning in Tracy, CA from VJ Pressure Washing gets the job done faster and more thoroughly than DIY,
Do Gutter Guards Need to Be Cleaned?
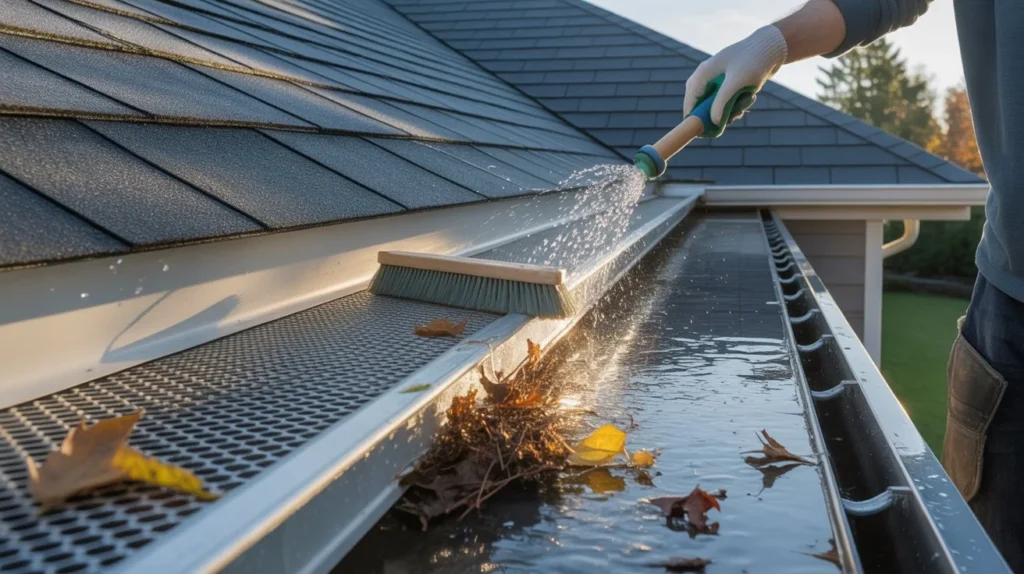
Gutter guards save time. But they don’t save you from all maintenance. Many homeowners install them and never look up again. That’s a costly mistake that leads to water damage, pest problems, and clogged downspouts. So, do gutter guards need to be cleaned? Yes, they do. Just less often than open gutters. Debris still builds up on top and around them over time. This guide covers exactly when, why, and how to keep them working right. What Are Gutter Guards? Gutter guards are covers or inserts that sit over or inside your gutters. Their job is simple: block leaves and debris from getting in while letting water flow through. They come in many forms. Some use fine mesh. Others use foam, brush bristles, or solid covers with a curved edge. Each type works differently and has its own maintenance needs. Most homeowners install them to reduce how often they need to climb a ladder. And they do help. But they’re not a “set it and forget it” solution. Why Gutter Guards Still Need Cleaning Here’s the truth most gutter guard companies don’t advertise: debris still collects. Leaves land on top of mesh guards. Small seeds get lodged in foam inserts. Pine needles slide through openings. Shingle grit washes into fine-mesh systems. Algae and mold grow in moist spots. Over time, this buildup slows water flow. Water starts sitting on top of guards instead of draining through. That means overflow, fascia damage, and foundation issues. The guards do their job, but they still need help doing it. How Often Should Gutter Guards Be Cleaned? Most homes need gutter guard maintenance once or twice a year. A spring check and a fall clean are the standard. If you have heavy tree cover, especially pine trees, you may need three visits per year. Here’s a simple guide: Low tree cover: Once a year Moderate tree cover: Twice a year Heavy tree cover or pine trees: 2 to 3 times a year If you live in Tracy, CA, and want a local team to handle it, VJ Pressure Washing offers professional gutter cleaning service Tracy CA residents trust. Regular maintenance visits keep your system running clean without the guesswork. Skipping a year might seem fine. But two or three skipped years? That’s when real damage starts. Signs Your Gutter Guards Need Cleaning You don’t always need a schedule. Your gutters will tell you when something’s wrong. Watch for these signs: Water overflows during rain. If water pours over the sides instead of draining down the spout, that’s a blockage. Plants growing in gutters. Seeds and dirt collect in moist debris. If you see weeds or moss, your gutters need attention. Sagging gutters. Standing water and heavy debris put stress on gutter hangers. Sag means weight buildup. Stains on fascia boards. Dark streaks on the wood behind your gutters signal overflow and moisture damage. Pest activity near the roofline. Birds, squirrels, and insects nest in clogged gutters. If you see activity up there, debris has gathered. Mold or mildew near the foundation. Overflowing water that pools at the base of your home leads to mold growth below. Any one of these signals means it’s time to inspect your gutter guards. Different Types of Gutter Guards and Their Cleaning Needs Not all gutter guards clean the same way. The type you have shapes how much work you’ll do. Micro-Mesh Guards These are among the best at blocking debris. Fine holes let water in but keep most particles out. Still, fine dust and shingle grit can clog the mesh. Clean with a soft brush and garden hose once or twice a year. Foam Inserts Foam fills the gutter channel and lets water seep through. Seeds and dirt get stuck in the foam fast. These need the most frequent cleaning. In heavy debris areas, check them every few months. Brush Guards Bristles catch large leaves but trap smaller debris deep in the fibers. Over time, they become dense with buildup. Pull them out annually and rinse well. Screen Guards Basic metal or plastic screens block large leaves. Wind blows lighter debris off. These are easier to clean. A rinse from the hose usually does the job. Reverse Curve (Surface Tension) Guards Water clings to the curved surface and drops into the gutter. Large debris falls off. But small stuff like seeds can sneak in. Check these once a year and clear any openings. Solid Covers These keep almost everything out. But they depend on slope and angle. Snow, ice, and heavy rain can overwhelm them. Inspect after winter storms. What Happens If You Never Clean Gutter Guards? Ignoring gutter guard maintenance leads to a chain of problems. It starts slow and gets expensive fast. Step 1: Debris builds up. Leaves, dirt, and seeds pile on top of or inside the guards. Step 2: Water backs up. Blocked guards can’t drain properly. Water sits and eventually overflows. Step 3: Fascia and soffit rot. Constant moisture damages the wood trim behind and below your roof edge. Step 4: Foundation damage. Water that pours off the side of your home pools at the base. Over years, this weakens your foundation. Step 5: Pest and mold problems. Standing water and wet debris create the perfect habitat for mosquitoes, rodents, and mold. Step 6: Gutter collapse. The combined weight of wet debris and standing water can pull gutters away from your home entirely. A simple cleaning twice a year prevents all of this. Can You Clean Gutter Guards Yourself? Yes. Many homeowners handle this on their own. Here’s what you need: A stable ladder Work gloves A garden hose with a spray nozzle A soft bristle brush A gutter scoop (optional) Step-by-step process: Set your ladder on solid ground. Have someone hold it if possible. Remove any visible debris from the top of guards by hand. For removable guards, take them out and rinse them on the ground. Use a brush to scrub off algae or stuck-on grime. Flush the gutter channel