
Can You Power Wash a Fridge?
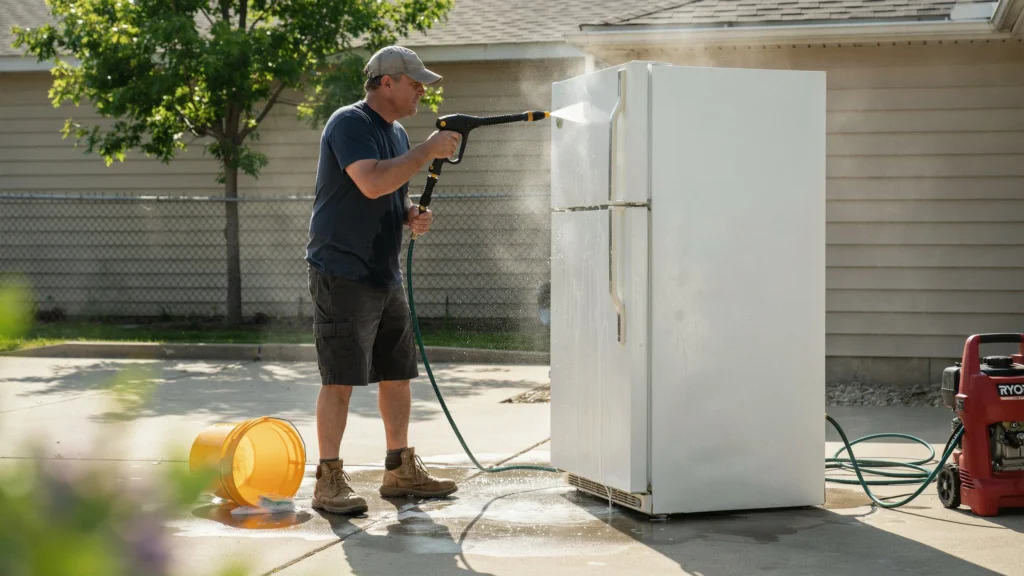
A refrigerator is necessary in the kitchen. From keeping food fresh, drinks cold, and making frozen treats, to perhaps even helping make the kitchen a safe place to work, the refrigerator is a staple in at-home cooking. Since refrigerators come in contact with food spills, dust, grease, and the general daily grime, cleaning and maintenance are required. Some homeowners wondered, “Can I power wash a fridge?” In other words, don’t power-wash your fridge. Unlike outdoor spaces such as your driveway or the side of your home, refrigerators have electrical components and insulation, plus motors and other sensitive parts that could get damaged by water at high pressure. A pressure washer could cause you to have electrical issues, rust, and a fridge that you have had to pay to fix. Can You Power Wash a Fridge? Does a pressure washer clean a refrigerator? Power washing is great for outdoor cleaning, but not kitchen appliances. It’s best to never power wash a fridge because… Water can get into electrical parts. The pressure can force dust and dirt into the seals or insulation Moisture can lead to rust and corrosion Internal components may cease functioning properly Could your appliance be dangerous to you? If it is Morse? Refrigerators are meant to be cleaned with the help of a clean cloth, a mild detergent, and some common sense about maintenance. It is always better to err on the side of caution and be too gentle with your cleaning instead of too harsh with the pressure wash. For exterior surfaces and tough outdoor grime, professional house washing Tracy CA services are a safer and smarter choice. When it’s dirty, the answer is to scrub it with your hands, not with power washing. How to Clean a Refrigerator Safely Safe cleaning techniques for the refrigerator ensure the protection of both your appliance and your food. They say a well cleaning routine will remove bacteria, odors, and buildup without damage to your appliance. Following are the steps to clean a refrigerator safely safe to clean refrigerator 1: Unplug the Refrigerator. Please remember to always unplug the outlet in English! Before cleaning deeply, unplug your refrigerator from the wall. This minimizes the chance of an electrical problem and enables you to clean safely. Quick cleaning: You probably don’t need to unplug the appliance for regular quick cleanings, but for a deep cleaning it’s best to turn the power off. 2: Take Everything Out and Toss First Things First, you need to take everything out of your fridge and check the expiration dates. Throw away any that are spoiled and place any products that need refrigeration in a cooler. Taking food off the shelves also makes it easier to clean the shelves and drawers and scrub the corners. 3: Drain and rinse all in warm water with a few drops of mild dish soap. Let the glass shelves warm up to room temperature before cleaning, as temperature shocks can cause them to shatter. 4: Clean Inside Surfaces Clean inside surfaces Twice a week, clean the inside surfaces with a baking soda solution. Make a paste of half a cup of baking soda with a quart of warm water, and use a clean cloth or sponge to apply the paste. Wipe out the following with a clean cloth: Walls Shelves Door compartments Drawers Seals around the door Avoid harsh chemicals that may have toxic residues near your food storage. 5: Everything Should Be Dry After Cleaning. Before you handle food again, everything had better be dry. Excess moisture can lead to mold growth and bad odors. Cleaning Refrigerator Coils A quick tip (and yes, I’ve seen skinks do this!) is that you clean the coils. Coils of the refrigerator are usually found at the back or bottom of the unit. They release heat, so the fridge can remain cool at the correct temp Striped coils on the back or underneath your fridge are part of its cooling system, but when they get covered in dust and grime, it makes the fridge work harder. This may cause: An increase in your energy bill. Decreased cooling capacity Overheating Reduced life expectancy of the appliance How to Clean Refrigerator Coils Follow these steps: Unplug the refrigerator. / Locate the coils. / Vacuum up any dust that is loose. For Any Stubborn Dirt That’s Stuck, Use a Coil Cleaning Brush. Clean up the area around you. Tuck it into the fridge. Coils must be cleaned well, as they are an important component of the cooling system. HOW DO I CLEAN A FRIDGE? How do you clean inside your fridge? Keep away from: Pressure washers Abrasive scrubbers Harsh chemicals Excess water It should clean well and not harm the materials and electrical parts of the refrigerator. Refrigerator Maintenance Tips Following some basic refrigerator maintenance guidelines can boost its performance and avoid some of the common issues. 1: Keep the door seals clean. The rubber seals on your fridge door must help to keep the cold air in. Cooling issues may result if the seals are dirty or damaged. Clean them with a warm cloth and water regularly. 2: Don’t Pack the Fridge too Full. A fridge requires good airflow to ensure a consistent temperature. Overcrowded shelves can impede airflow. 3: Verify temperature settings Maintain your refrigerator at the proper temperature to keep your food safe and your energy bills low. 4: Clean spills at once Spills are easy to clean with your towels before it dries. Cleaning spills immediately will prevent odors and sticky residue. 5: Defrost If Needed A few fridges need to have the ice taken off every now and then. Too much ice build-up can impair performance. 6: Look for Unusual Problems Watch For: Off sounds Leaks of water No or poor cooling Too much frost Early attention can stop bigger issues Conclusion So, is it safe to use a power washer on a fridge? No, applying water under high pressure to clean a fridge isn’t any sort of safe cleaning
Do People Power Wash Driveways?
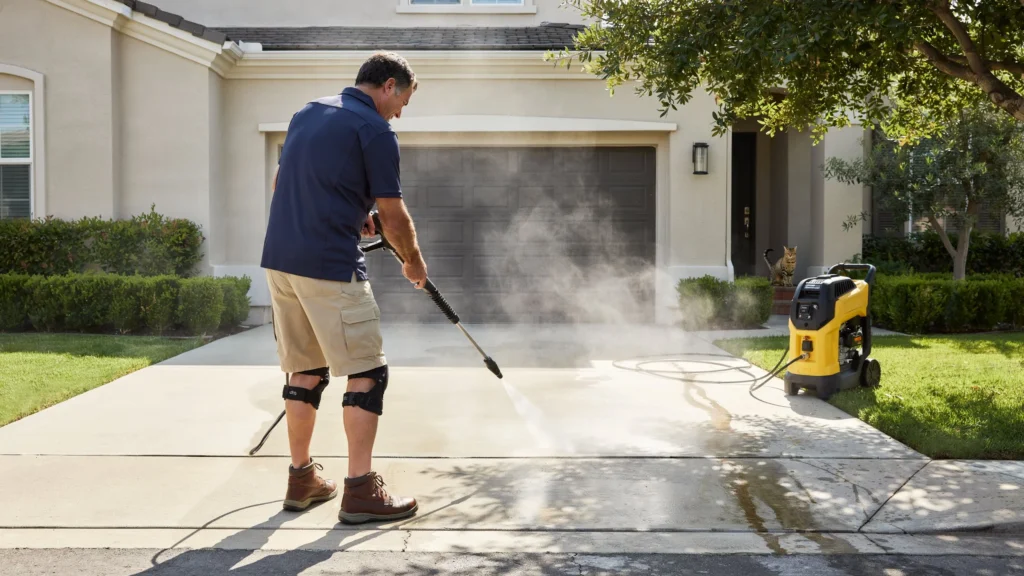
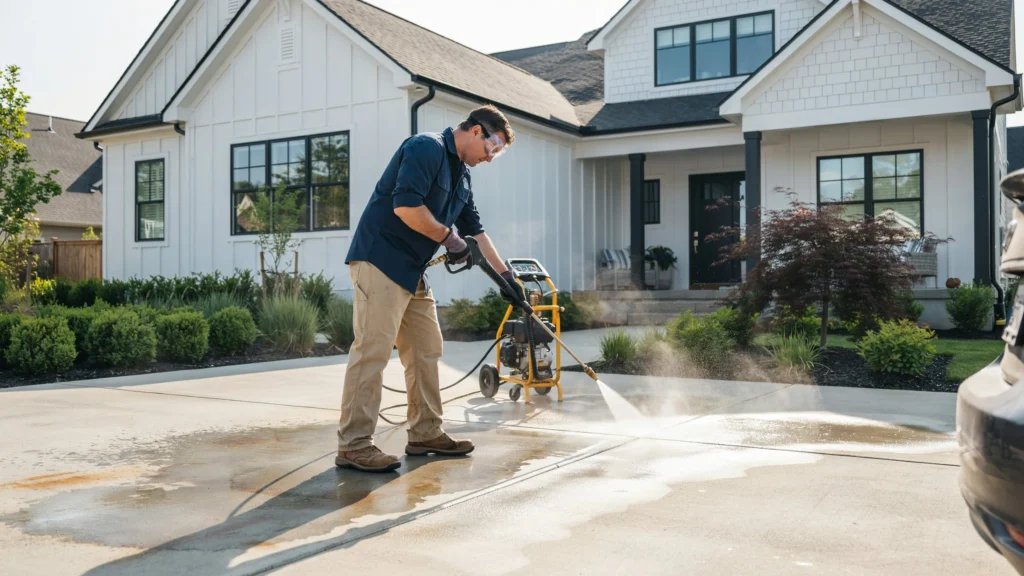
A driveway is one of the first elements of the home exterior that visitors see. Over time, dirt, oil stains, mud, tire marks, algae, mold, and all sorts of grime can accumulate on driveways, making the entire property look run-down and forgotten. “Do people power wash driveways?” Sure, do! Power washing is the best way to clean a driveway and remove tough stains that your traditional cleaning method won’t take care of. Power washing is becoming a popular service to have done in our homes; they clean deep in just minutes. A pressure washer emits a high-velocity jet of water to remove dirt, gunk, and deposits accumulated for years on concrete, asphalt, and brick driveways, making them look as if they are new. Do People Power Wash Driveways? Yes, they power wash their driveways routinely to maintain their cleanliness, hospitality, and good condition. Driveways also experience the endless force of nature and traffic, including weather, cars, running feet, and outdoor debris. Outdoor stains are a bane for many of us; rain, dust, oil drips, and even organic materials can cause tough stains that are difficult to remove once time has elapsed. These problems are preventable if you care for your driveway by cleaning and sealing it on a regular basis and you’re diligent about how you keep it looking. Surface dirt is easily removed by sweeping and rinsing with a garden hose, but they usually don’t have the power to lift deep stains and ingrained dirt. Power washing is a cleaning tool using a high-pressure water jet, which is much better at cleaning than normal cleaning. Power Washing a Driveway Professional cleaners at VJ Pressure Washing usually suggest power washing for: Concrete Driveways Brick Driveways Stone Driveways Paver Driveways Certain asphalt areas Overaggressive cleaning can harm the surface, and you need the right tools and technique Pressure Washing a Driveway Pressure washing a driveway is the use of a machine that uses highly pressurized water to clean dirt, stains, and other materials away from the driveway. Some power cleaners also employ warm water; this is particularly helpful to get rid of grease and oil. If you are looking for pressure washing concrete driveway Tracy CA, our team is ready to deliver outstanding results. The procedure is normally as follows: Cleaning of driveway surface Loosening dirt and debris from the surface Using a cleaning agent if necessary Applying a stain remover with a pressure washer Wash off any dirt and chemicals that are left Let the driveway dry, and the stains fade Depending on the state and type of driveway, the cleaning method may vary. Driveway Pressure Washing Driveway cleaning with pressure washing is simply water coming out of a small hole at the end of a wand at very high speed. The pressure dissolves dirt, grime, algae, and stains adhered to the surface. Several factors influence the efficacy of the pressure washing method: 1. Water Pressure Various surfaces need varying levels of pressure. Concrete needs to be washed with a much stronger pressure, while thin or crumbling surfaces must be washed with a much milder pressure. 2. Cleaning Solutions Certain stains, for example oil and grease, require specialized cleaning agents before pressure washing. Cleaning agents degrade or alter the physical properties of stubborn materials, making matter easier to remove. 3. Quality of Equipment High-quality professional equipment can be more effective than small domestic ones as it ensures even pressure and coverage throughout. Benefits of Power Washing a Driveway Advantages of power washing a driveway: If you are wondering why you should add power washing the driveway to your maintenance to-do list, then here are some things that will convince you. 1. Enhances Your Home’s Curb Appeal A grimy driveway can make even a stunning home look worn and drab. Power washing removes stains and sheds dust and dirt, making it so the driveway clean and bright. Clearing the driveway also projects a good image to visitors, neighbors, and anyone who might be interested in buying your home. 2. Eradicates Stubborn Stains Oil drips, vehicle fluids, dirt buildup, mold and algae, tire marks, and even rust are just some of the unsightly things that can appear on your driveway. Oil leaks Vehicle fluids Dirt buildup Mold and algae Tire marks Rust Many of these stains can be washed away, and power washing can do just that! It will remove stains on the surface that cannot be washed away – and make your surface look like new again. 3. Prevent Damage Soil, algae, and even organics can destroy the layers of driveway materials from within. The moisture moss or algae holds could also contribute to surface degradation with time. Washing frequently keeps the driveway clean and safe from expensive repair works. 4. Raise Property Value Cleanliness, order, and control outside your home can also bring your home a long way. A neat and clean driveway helps to improve the curb appeal of your home and attracts more home buyers. 5. Time and Work Saving Cleaning a driveway by hand can take days and still not yield great results. A pressure washer can do a better job in less time. 6. Results in a Safer Surface Algae and moss can cause driveways to become slippery, particularly when rain comes into the picture. Eliminating these growths also leaves a cleaner and safer space to walk. How Often Should You Power Wash Your Driveway? Many homeowners ask, “How often do I need to power wash my driveway?” The answer depends on a number of things, like the weather, driveway surface, and how busy your driveway is. Generally speaking, power washing most driveways should be: Just once a year for routine maintenance needs. Twice a Year in Regions with High Dirt, Moisture and Pollution Levels Before selling a house Before application of a sealant You may require more cleanings if your driveway has: Heavy vehicle traffic Oil stains Trees growing nearby High moisture Surface mold or algae growth Frequent cleaning can prevent stains from becoming
What Is the Best Method of Washing a House?
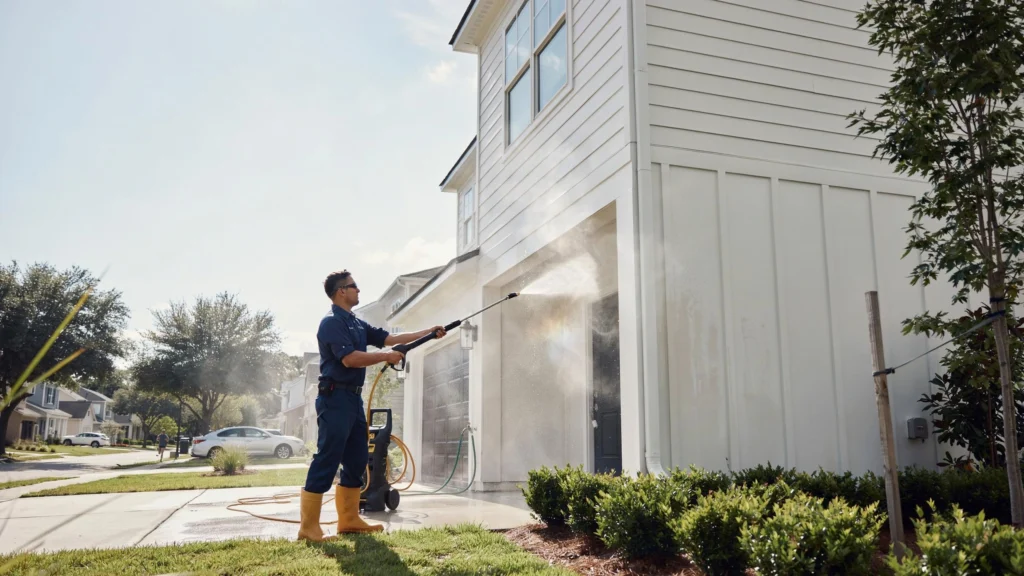
Regularly cleaning the exterior of your home is a basic yet very important part of home maintenance to keep it looking clean, protect building materials, and enhance curb appeal. It can remove layers of dirt, dust, grime, mold, mildew, algae, stains, and air pollution that cause discoloration on your home and make it look old and tired from the outdoors. But also many homeowners wonder: How do I wash the house? The appropriate approach depends on the type of materials used to build your home’s exterior, the nature of the dirt, and how much cleaning is needed. In general, a mixture of mild cleaning methods, appropriate detergents, and the right equipment will yield the safest and most effective results. Although pressure washing enables hard stains to be eliminated rapidly, soft washing is sometimes the better choice for more delicate surfaces. Understanding the Best Method of Washing a House New residential construction with vinyl siding, painted surfaces, stucco, or older materials should be cleaned by soft washing. At VJ Pressure Washing, our soft washing procedures involve cleaning with low pressure and warm water rather than high-pressure cleaning, and is therefore less likely to cause damage to your home. Pressure washing is high-pressure water cleaning that is used to break down difficult dirt. It performs well on solid surfaces like concrete, brick, some stones, as well as other strong surfaces. It should also be noted that too much pressure in delicate areas can result in cracks, paint damage, or water intrusion. A typical house wash involves the following: Examine the surface of the exterior shell Removing loose dust and debris that is loose Using a suitable cleaner solution Let the detergent degrade the stains Rinse with the water pressure under control Inspect for any spots that have been missed, and clean up one last time The correct method selection will help you to safely clean your home and bring out the best results. Soft Wash vs Pressure Wash House They’re each great tools, but made for different applications. Soft Washing Soft washing is a specialized cleaning service that applies organic-based cleaning solutions to effectively clean your exterior and remove organic stains and soils. The cleaning solution kills mold, mildew, algae, and bacteria rather than just removing them by force. Benefits of soft washing include: Safe for delicate siding materials Less chance to damage the surface Lasts longer Soft washing is generally advocated for the following surfaces: vinyl siding, wood siding, stucco, roof shingles, and painted surfaces. Since the detergent is still active on the surface after application, it is claimed that soft washing yields longer-lasting results. Pressure Washing Pressure washing cleans surfaces with a high-pressure stream or jet of water to remove dust, dirt, oil, and other types of soil or contaminants. If you are looking for professional house washing Tracy CA, VJ Pressure Washing delivers powerful results with benefits that include: Good value for money Heavy sediment is removed quickly Ideal for concrete and brick Good for driveways and patios Less chemical cleaning needed The pressure washer is ideal for: concrete walkways, driveways, brick walls, stone surfaces, and patios. Best House Washing Detergent Choosing the right house washing detergent is key to a clean and safe outcome. Various surfaces need to be cleaned using different chemicals. A quality exterior house detergent will clean dirt and stains well, be safe to use on siding, assist in the removal of mold and mildew, not harm plants or landscaping, and be easy to rinse out. 1. Exterior Cleaners that are Environmentally Friendly These exterior cleaners allow you to clean everyday dirt from surfaces without compromising the health of the environment. They can also be used for regular maintenance of your home. 2. Cleaners for Mold & Mildew Solutions Homes in humid regions get mold, algae, and mildew. Professional mold removal cleaners treat these problems and slow down regrowth. 3. Safe Detergents for Siding Vinyl and painted siding require gentle cleansers that can clean them effectively without causing any fading or damage. Please adhere to the instructions for use and test the cleaners on a small hidden area prior to application for the entire house. How to Clean Exterior Siding Siding is one of the most exposed areas of a house; regular cleaning will help prevent it from staining and weathering. Here’s how to clean siding effectively: Step 1: Inspect the Siding Look for cracks, loose or damaged siding panels, peeling paint, and open holes that might allow water in. After the repairs have been taken care of, you can go in and clean them up. Step 2: Get Rid of Loose Soil and Dirt Use a soft-bristled brush, a garden hose, or your fingers to get rid of surface dust, leaves, and other debris. That makes the cleaning solution work better. Step 3: Rinse off Thoroughly After the cleaner has had time to work, rinse the siding off with water. Don’t spray water overhead, as it may go behind the siding. Step 4: Inspect the Results Look for stains and spots that have not been completely removed, or if you think an area requires further attention. For long-lasting grime buildup, you might have to apply again. Conclusion Soft washing is the safest and most effective way to clean the exterior of most homes. Pressure washing continues to have a place for harder substances such as concrete and brick.When it comes to soft wash vs pressure wash house cleaning, the best house washing detergent, and how to clean exterior siding the right way, these tips can help keep your home looking beautiful and protected. Using the right products and methods will keep your home exterior vibrant and well kept for years. For expert help, contact us at VJ Pressure Washing today! FAQ What is the best method to wash the exterior of a house? Soft washing is the safest option for most homes. For harder surfaces like concrete and brick, pressure washing works better. What is the difference between soft washing and pressure washing?
What Is the Best Time to Clean a Roof?
Keeping the roof in good condition is the key to protecting a house. To be sure, many homeowners pay attention to gutters, siding, and landscaping, but they neglect the roof until problems become obvious. Over time, dirt, algae, moss, lichen, leaves, and other debris can build up, compromising not only the appearance but also the roof’s performance. And so now we have many homeowners asking us, “When is the best time to clean a roof?” When you clean your roof, it’s pretty significant for getting the best results. Cleaning at the best time helps remove contaminants more thoroughly, preserves roof materials, and increases safety. After learning this knowledge, it can help any home stay strong and have a good looking roof. Why Roof Cleaning Is Important A roof is always under the influence of the outdoors. Rain, wind, sun, pollen, leaves, and other debris mixed with dirt: a layer of grime forms on roofs. Regular cleaning of the roof prevents moisture from being trapped under its surface, and it also keeps the roof clear of algae, moss, and mildew. It also enhances the curb appeal of the house and elevates the lifespan of roofing materials. Proper care catches the minor problems, and the same are solved before they get blown out of proportion and become major, costly problems. For homeowners in the area, our roof cleaning service Tracy CA is here to help you stay ahead of those issues before they turn expensive. What Is the Best Time to Clean a Roof? Weather patterns, climate, and roof condition all play a part in this question. In general, mild weather is best, and this makes roof cleaning safe and effective. Heat, freezing temperatures, heavy rain, and strong winds can hinder roof cleaning and can be dangerous. Most roofers advise that you arrange for roof cleaning in the warm or cool season when the temperature is in a moderate range, and the weather is not too uncertain. At VJ Pressure Washing, we recommend scheduling your roof cleaning during spring or fall for the best and safest results. Best Season for Roof Cleaning A lot of homeowners ask what the best time to clean a roof is. Spring and fall often provide the ideal conditions to clean a roof because the weather is neither too hot nor too cold, and there are usually enough mild days in a row. Cleaning agents do their job in these seasons without being hastened by the sun or slowed down by the cold. Selecting the right time to clean your roof can lead to better cleaning results and less chance of damage to your roof. Spring Roof Cleaning Benefits Spring is usually considered the best time for roof cleaning in most areas. Winter storms tend to pack the dirt and debris along with moisture conducive to the growth of algae and moss. Spring roof cleaning helps restore its clean look and gets it ready for the summer heat. Because spring weather is generally moderate, it is often simpler and safer to perform work on the roof during this time. Fall Roof Cleaning Advantages For many homeowners, fall is another great season for roof cleaning. Leaves, twigs, and other organic material get deposited on roofs in autumn. Cleaning off these materials can help prevent moisture and drainage problems in the winter. Fall cleaning, with its inspection and cleaning, can help a homeowner catch a roof problem before inclement weather arrives. When Should You Clean Your Roof? It depends on various factors like the climate in your region, vegetation around your home, and what you see in the way of contamination. In general, you can answer “when should you clean your roof” by looking for algae stains, moss, accumulated debris, or discoloration. These are all signs that it’s time to clean. Routine examinations enable you to pinpoint the best time to perform upkeep. Roof Cleaning Weather Conditions Proper weather conditions should be dry for good cleaning efficiency. Dry weather and mild temperatures are usually the best. During heavy rain, you are creating a sliding risk, which can cause falls or slips off the roof. Good weather conditions are crucial for cleaning solutions to do their job without being washed off too soon. This is why fall, when the weather turns cool and dry, is often ideal. Watching the weather forecasts before booking a roof cleaning job is always a good idea. Avoid Cleaning During Extreme Heat High temperatures in summer can make for difficult roof cleaning conditions. Cleaning solutions may dry too rapidly and become less effective, leaving streaks. Moreover, a hot roof is uncomfortable and possibly dangerous to work on. Selecting cooler times of the day aids in both safety and cleaning efficacy. Avoid Roof Cleaning During Rain Rainy weather makes for bad roof cleaning conditions. Wet surfaces are slick and dangerous underfoot. Rain can also dilute detergents and diminish their effectiveness. In order to get the best results, always clean your roof in dry weather. How Often Should a Roof Be Cleaned? Though cleaning rates depend on region and roof style, in general it is suggested to clean once every 1 to 3 years. How soon your roof needs cleaning depends on factors like humidity, tree cover, and weather patterns in your area. Periodic inspections can help establish how often each home needs to be cleaned. Conclusion So, when is the best time to clean a roof? Spring and fall are the best times to do roof work in most situations. These seasons bring just the right temperatures and weather conditions for roof cleaning without risking your health and getting the job done right. Removing debris, algae, and other contaminants that accumulate on roofs minimizes long-term damage. Understanding when to clean your roof allows homeowners to fix issues at an early stage and keep the exterior of their property presentable. Regular reviews also establish how often a roof should be cleaned, allowing for upkeep as necessary. With just a little foresight, homeowners can enjoy a longer-lasting
How Many Litres of Water Does a Pressure Washer Use?
Pressure washers are the best way to clean driveways, patios, decks, cars, siding, and a million things outdoors. They remove dirt, grime, mold, and stains at a pace that is far superior to traditional rubbing and scrubbing with their high-pressure water jets. However, many household or business owners are wondering: how much water does a pressure washer use? This depends on several factors, such as the type of pressure washer you have, the flow rate, what you’re cleaning, and how long you run it. Knowing how much water a Pressure washer uses per minute can be invaluable information for users in making decisions regarding water consumption, efficiency, and operational costs. Understanding Pressure Washer Water Usage How much water does a pressure washer use? Before we get the answer, you should understand how pressure washers work. If you are looking for professional driveway power washing services in Tracy, CA (driveway power washing services tracy ca) our team has the expertise and equipment to get the job done efficiently while keeping water usage to a minimum. Pressure washers use a motor or engine to pressurize the water and force it through a small orifice at high pressure. The pressure is high, but the total water consumption is usually much lower than what people anticipate. Water consumption of pressure washers is generally expressed in litres per minute (L/min) or gallons per minute (GPM). It is this flow rate which determines the water used in a cleaning job. Average Pressure Washer Water Consumption Flow Rate The most crucial aspect when you answer How much water does a pressure washer use? is the flow rate of the machine itself. The water consumption of most residential pressure washers is between 6 and 12 litres per minute. Commercial and industrial units can consume as much as 15 to 30 litres per minute and beyond that. Typical Pressure Washer Water Usage includes: Small electric units: 6-8 l/min Medium home models: 8-12 l/min Professional units: 12-20 litres per minute Industrial units: 20-30+ l/min This gives you an idea of how much water certain equipment will make you use. How Much Water Does Pressure Washing Use per Hour? Many people like to be able to see how much water they are using at the hour level. Calculating the amount of water pressure washing uses is just the flow rate multiplied by 60 minutes. For example: 8 litres per minute = 480 litres per hour 10 litres par minute = 600 litres par heure 15 litres par minute = 900 litres par heure 20 litres par minute = 1 200 litres par heure Water consumption of airless painting machines: How much water is needed in airless painting machines? The duration for which the pressure washer is running determines how long the actual consumption lasts. Water Usage of Pressure Washers One “myth” is that pressure washers use too much water. Pressure washers may use less water than a garden hose. Many garden hoses consume 15 to 25 liters of water per minute. A pressure washer may be more effective at cleaning and use only 8 to 12 liters per minute, whereas a hose consumes 15 to 25. This leads to faster cleaning, with potentially less water consumption. Since water conservation is a concern, pressure washers often clean a surface more quickly with less water than a standard hose. Pressure Washing Water Efficiency One of the reasons pressure washers are so popular is their amazing Efficiency of water Pressure washing. Since the water is delivered at high pressure, it can dislodge dirt and debris much faster without the need for excessive amounts of water. Better Pressure washing water efficiency also means users can finish cleaning jobs sooner – and use less water overall. This marriage of power and conservation makes pressure washing a viable cleaning option for home-based as well as office or retail applications. Why Pressure Washing Water Efficiency Matters Water conservation is now of great concern all over the world. Increasing Pressure washing Water efficiency enables homeowners and businesses to lessen their environmental impact. At VJ Pressure Washing, we are committed to delivering powerful cleaning results while keeping water usage as low as possible, helping both homeowners and businesses in Tracy, CA do their part for the environment. Effective cleaning products and methods also reduce water and energy use as well as associated utility costs, and they promote the sustainable maintenance of building grounds. Using water-efficient equipment is good for the user and good for the environment. Factors Affecting Pressure Washer Water Consumption Water consumption by pressure washers depends on several things. These are: Machine size Pressure rating Flow rate Nozzle selection Cleaning surface Duration of operation With this knowledge, users can make better estimations of water needs. 1. Electric Pressure Washers Electric pressure washers are more often designed for household use and requirements. As for How Much Water Does Pressure Washing Use, electric models are usually the most water-efficient type. The majority of electric models have a flow rate of 6 to 10L per min, which makes them perfect for small to medium cleaning tasks. Lower flow rates also mean better Pressure washing water efficiency. Gas Pressure Washers Pressure washers that run on gas are usually more powerful than those that run on electricity. The Flow rate of pressure washers in this range is usually between 10 and 20 litres per minute. These units are designed for bigger cleaning jobs and may actually consume more water compared to smaller residential units. That said, they do tend to work faster because they clean better. Conclusion So how many litres of water does a pressure washer consume? This depends on the type of equipment, its flow rate, and the job that is being done. Most home pressure washers draw between 6 and 12 litres of water per minute, with larger models capable of using considerably more. The truth is that the water consumption for pressure washers is usually less than what some people anticipate, particularly when compared with regular garden hoses.
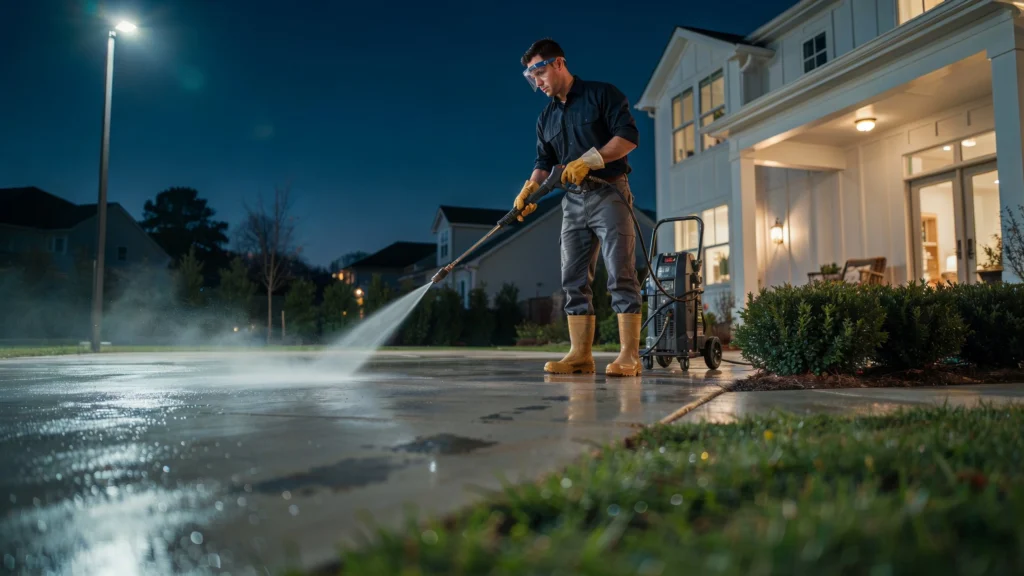
Can I Pressure Wash at Night? 5 Honest Truths You Need to Know
You had a long day. The driveway still looks grimy. The kids are finally in bed. And now you’re thinking about grabbing the pressure washer before it gets too late. It sounds like a good plan. But is it actually safe, smart, or even allowed? Yes, you can pressure wash at night in most cases but there are real safety risks, noise concerns, and visibility problems you need to think through first. Can I pressure wash at night without causing problems? That depends on where you live, what you’re cleaning, and how prepared you are. This article covers everything you need to know. Is It Safe to Pressure Wash at Night? The short answer: it can be safe, but the risks go up after dark. Pressure washing uses water at high force. That alone demands full attention. Now add low-light conditions, wet surfaces, and tired eyes and your risk of slipping or making mistakes increases. Here’s what actually changes at night: Visibility Drops Fast You can’t clearly see what you’re spraying, where water is pooling, or if a surface is cracking. Missing these cues can cause surface damage or personal injury. Wet Surfaces Are Harder to See Puddles look invisible in poor light. One wrong step on a slick driveway or patio tile and you’re down. Electrical Hazards Become More Serious Water near outdoor outlets, extension cords, or lighting fixtures is always a risk. At night, it’s easier to miss a hazard you’d spot in daylight. Fatigue Affects Your Control Operating a pressure washer when you’re tired reduces reaction time. The machine kicks back. Your grip matters. None of this means nighttime pressure washing is off the table. It means you need to take it more seriously than a daytime job. Benefits of Pressure Washing at Night Despite the risks, there are real reasons people choose to pressure wash after dark. Some of those reasons are actually quite practical. 1. Cooler Temperatures Help Surfaces Dry Properly In summer, daytime heat can cause water to evaporate too fast. This can leave streaks or detergent residue on concrete and siding. Cooler nighttime air gives surfaces time to rinse and dry evenly. 2. Lower Water Pressure on City Systems In some areas, municipal water pressure drops slightly during peak daytime hours. Late at night, you get more consistent water flow, which can improve your wash results. 3. No Direct Sunlight Means Less Glare Bright sun on a wet concrete driveway can cause serious glare. At night, with a proper work light, you control the lighting and reduce eye strain from reflections. 4. Less Foot Traffic and Distraction Daytime washing means dealing with neighbors walking by, vehicles, kids, and pets. Nighttime pressure washing is often quieter in terms of activity, which lets you focus. 5. Cooler Surfaces Absorb Cleaning Solutions Better Hot concrete in the sun repels some cleaning solutions before they can work. Cooler surfaces at night allow dwell time, which means your detergent actually does its job. These are real advantages especially for residential pressure washing tips that focus on getting the best clean possible. Potential Drawbacks of Nighttime Pressure Washing The benefits are real, but so are the downsides. Here are the ones that matter most. Noise Complaints Are a Major Issue Pressure washers are loud. Most residential areas have noise ordinances that kick in after 10 p.m. or even 9 p.m. in some neighborhoods. Pressure washing after dark, especially near bedrooms or in close quarters, can lead to complaints or fines. You Miss What You’re Cleaning Without full visibility, it’s easy to over-spray delicate areas, miss grimy patches, or damage a surface without realizing it. You won’t know until daylight shows you the result. Setup Takes Longer Laying out hoses, finding outlets, setting up work lights everything takes more time and effort at night. A 30-minute job in daylight can take twice as long after dark. Runoff Is Harder to Manage Dirty water and cleaning solutions run into driveways, lawns, and storm drains. At night, you can’t see where it’s going. Some of those chemicals can harm plants or local waterways if not managed properly. Slip and Fall Risk Is Higher This is the biggest safety concern. Wet concrete, tile, wood decking all of these become more dangerous when you can’t see the water clearly. Best Surfaces to Pressure Wash at Night Some surfaces handle nighttime washing better than others. If you’re going to clean after dark, these are your safest choices: Concrete Driveways and Walkways Flat, open, and easy to light. Use portable work lights and you’ll be fine. Fences and Walls Vertical surfaces that don’t pool water underfoot. You stand back and spray, which reduces slip risk. Vinyl Siding As long as you’re careful around windows and light fixtures, vinyl handles nighttime washing well. Patios with Good Lighting If your patio already has overhead lights or you set up temporary ones, it’s a manageable surface at night. Garbage Bins and Outdoor Furniture These can be moved to a well-lit area for an easy nighttime clean. Surfaces That Are Better Cleaned During the Day Some jobs are just better done when you have full visibility and proper lighting. Wood Decks Wood is sensitive to pressure, and you need to see grain direction and any soft or rotten spots clearly. Nighttime washing on a deck increases the risk of over-washing or missing problem areas. Roof Washing This requires height, balance, and full visibility at all times. Never do roof work after dark. Painted Surfaces You need to watch closely for paint lifting, blistering, or streaking. You can’t catch those issues at night. Stone and Brick Mortar joints can be damaged if you spray at the wrong angle. Daytime gives you the visibility to avoid that. Vehicles and RVs Even with pressure washer-safe settings, cleaning a vehicle at night risks missing paint chips, seals, and trim details that need careful attention. Essential Safety Tips for Night Pressure Washing If you decide to move forward with pressure washing after dark, follow
What to Use to Wash a Driveway?
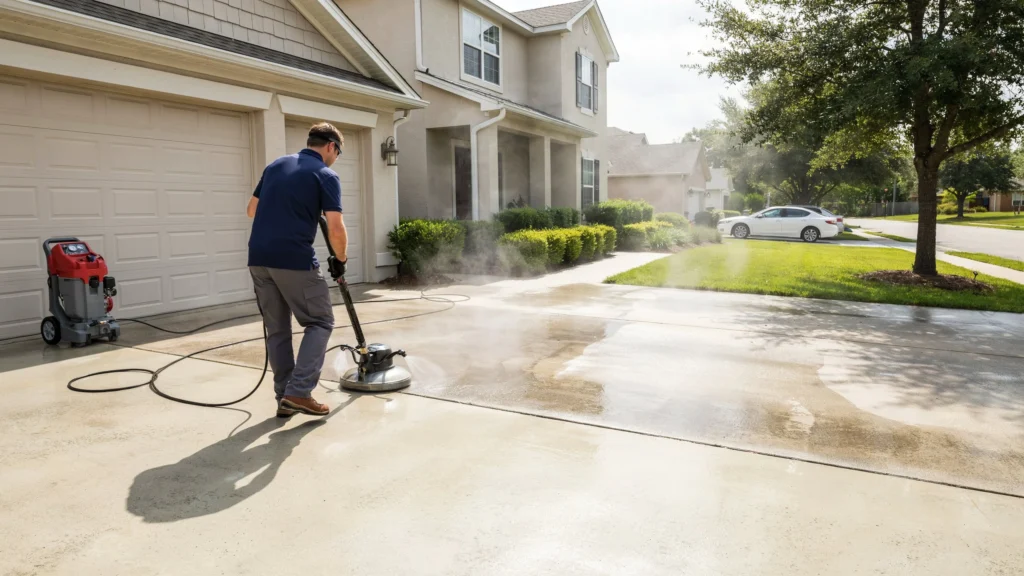
Your house will be more stylish with a clean driveway. Dust, tire tracks, oil stains, mold, mildew, algae, and other natural debris can settle on your driveway, which makes it look greasy and dull. Many people are curious to ask, what do you wash a driveway with, and how do you make it look like the job of a professional without impairing it? Which product to use will depend on the surface of your driveway, the kind of stains, and how much you want to clean up. No matter if your driveway is constructed from concrete, asphalt, brick, or pavers, there are cleaners and cleaning methods that will breathe new life into your driveway and help it last for years longer. Why Regular Driveway Cleaning Matters A driveway is among the most used parts of your home’s exterior. Vehicles, weather, and pedestrians continually batter it with dirt and grime. The benefits of regular cleaning are numerous: Helps your curb appeal, Prevents Stains from becoming permanent, Mold and Algae Growth is reduced, Life of Driveway is Prolonged, Safety is improved – wet and slippery surfaces are decreased, Property Value and your investment in your home is protected. Understanding what to use to clean a driveway can help a homeowner keep a clean and safe outdoor environment all year round. With VJ Pressure Washing, you can ensure your driveway stays spotless and well-maintained throughout the year. Best Driveway Cleaning Solution Choose the most suitable driveway cleaner appropriate for the kind of soil or stain on your driveway. 1. Mild Detergent and Water Warm water and mild dish detergent are all you need for routine cleaning. The solution penetrates dirt on the surface. Oil and grease stains, however, will call for stronger cleaning agents. 2. Degreasers Professional degreasers emulsify oil-based soils so they can be flushed away. Surface and light stains can be applied to the majority of driveway materials. 3. Oxygen Bleach Oxygen bleach is a safe and effective, environmentally friendly product that kills mold, mildew, and algae without any harsh chemicals. 4. Vinegar Remedy A solution of water and white vinegar is effective in removing organic stains and mildew. But take care with some surfaces you don’t want to damage them. Pressure Washing Driveway Tips Power washing is the only effective way to clean a grimy driveway. Using the correct driveway washing Tracy CA tips will enable you to get results that are comparable to those of a professional, but without compromising the surface. 1. Pre-washing Treatment Before pressure washing, treat oil stains, grease spots, and dirt with a degreaser or driveway cleaner with good reviews. Allow the cleaner to work on breaking down the substances for 10 to 15 minutes. 2. Sweep the Driveway First Remove leaves, dirt, stones, and other debris from the area before pressure washing. This allows the soil to be washed away, rather than coming between the water and the surface that you’re cleaning. 3. Use a Surface Cleaner Attachment A surface cleaner attachment delivers uniform cleaning, minimizing streaks. It also makes the job go faster than a regular spray nozzle. 4. Work in Small Sections Break up the job into little pieces, and take each one at a time. This way you won’t switch rooms, and dirt will be deeper. 5. Rinse Well After you have finished scrubbing, use a hose to rinse the driveway off of all the detergent along with the dirt and grime. A good rinse will also help to whiten the floor and prevent stains. Concrete Driveway Cleaner A good quality concrete driveway cleaner will significantly impact how well it cleans. Choose from products that: Get rid of the oil and grease stains Remove mold & mildew Are biodegradable Are safe for the plants around them Use with pressure washers Professional products can make a big difference in deep cleaning driveways. How to Remove Driveway Stains Knowing how to clean driveway stains is vital to keeping up a neat look. 1. Oil Stains Oil stains are also a popular driveway issue. To remove them: Cover the stain with an absorbent material, apply a degreaser, scrub vigorously, rinse thoroughly. 2. Grease Stains Grease needs to be treated several times with a special degreaser. 3. Rust Stains Apply a rust remover that is suitable for use on concrete. 4. Mould and Mildew Use an oxygen bleach or a solution of mildew remover, then scrub well. 5. Skid Marks Skid marks also can cause black lines to appear on your driveway, especially on concrete. These are typically the result of hot tires leaving rubber on the driveway over time. A good detergent and a special cleaner for tire marks applied with a stiff bristle brush can help you get rid of tire marks and bring back a clean look for your driveway. Conclusion If you’re wondering, “How do you clean a driveway?” It depends on the type of driveway you have and what stains are on it. Soap and water should suffice for standard cleaning. For heavy-duty stains, a concrete driveway cleaner or commercial degreaser is the best bet. The best product to clean a driveway and a few simple tips to pressure wash a driveway will bring your driveway back to life and protect it from damage again. Knowing how to get stains out of a driveway is just as crucial in keeping an eye-catching exterior as it is when it comes to having a driveway that lasts a long time. By maintaining your driveway regularly using the right cleaning approach and occasionally providing it with a deep clean, you will be able to enjoy a clean, good-looking, and strong driveway for many years. For more information or professional assistance, feel free to Contact Us today! FAQs What is the best solution to wash a driveway? For routine cleaning, warm water and mild dish detergent work well. For tougher stains like oil and grease, a professional degreaser or concrete driveway cleaner is the best option. Oxygen bleach is ideal for mold and
What Is the Correct Order to Clean Your House?
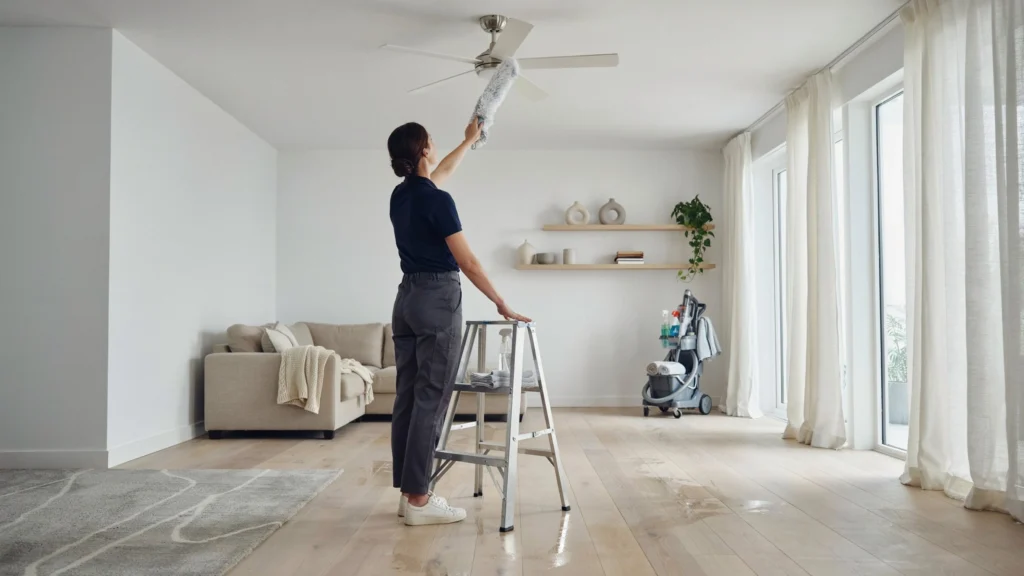
Maintaining a clean house can feel overwhelming if you don’t know where to begin. You may feel that dusting and vacuuming are on the losing side in some areas of your home. That’s why doing the cleaning in the right order is so important. So, what is the right order to clean a house? Observing an order of cleaning is more organized, efficient, and effective! Don’t just wander from one chore on the list to the next like a lost soul, but have a strategy to at least touch each room adequately. A well-defined step-by-step guide for how to clean a house enables you to clean the house without wasting your time and your energy. Why Cleaning Order Matters Cleaning a mess twice because you clean in the wrong order is annoying. Say you vacuum the floors before you dust the furniture, dust will land on the floor you just cleaned. At VJ Pressure Washing, we always recommend cleaning top to bottom and in the right order so every surface stays clean and no effort goes to waste. Cleaning in your home works fastest when you do it from the top down, and you’ll get the best results if you clean from the inside (cleanest area) moving outward (dirtiest area). This method keeps dust and dirt from being distributed, and cleaning is only done once. Best Way to Clean a House Efficiently The most efficient way to clean a house is to clean each room in the house each day and not clean in a random manner. Begin by collecting all your cleaning products for a task, then do the job. The clean-up process is smoother, and the motivation to keep cleaning stays up if you prevent unnecessary breaks to clean or start again after stopping to clean a mess. And if the outside of your home needs attention too, our exterior house washing services Tracy CA are just a call away. Room by Room Cleaning Sequence A good cleaning routine also keeps you on track and makes you more efficient. 1. Gather Cleaning Supplies First But first, get your supplies for the house cleaning in the correct order of steps. Among the standard cleaning products are microfibre cloths, sponges, disinfectants, glass polishes, vacuum cleaners, mops, buckets and refuse sacks. Preparation ensures there is no lag time between cleaning, and it also makes cleaning flow better. 2. Declutter Every Room Collect anything that belongs in another room and bring it back. Remove Chaos: Clear off your counters, tables, floors, and your shelves. While you are decluttering, you are clearing things out to make space, and you can get down and dirty, really clean under and behind things. 3. Start with Dusting Dusting should always precede vacuuming or mopping. While doing a house cleaning step-by-step guide, start dusting ceiling fans, light covers, shelves, furniture, and any other raised surfaces. Dust settles under gravity, so higher areas should be cleaned first. 4. Clean Windows and Mirrors Once dusting is done, go over glass surfaces. Clean windows, mirrors, and glass doors with suitable detergent and dry with a clean cloth. 5. Move to the Kitchen The kitchen is the busiest room in the house. Work from the countertops and appliances down as you wipe off. Clean the cabinet fronts, sink, and backsplash. Clean up by sanitizing your contact surfaces high. 6. Deep Clean Kitchen Appliances Grease, food residue, and bacteria build up in kitchen appliances. A thorough cleaning of the microwave, fridge, oven, and dishwasher regularly will ensure hygiene, enhance performance, and keep the kitchen smelling fresh. 7. Clean the Bathrooms Bathrooms are to be cleaned following the kitchen. As part of a good room-by-room cleaning routine, clean sinks, countertops, mirrors, toilets, showers, and tubs. Let cleaning solutions sit for a short duration prior to scrubbing. This enables easier removal of soap scum and stains. 8. Disinfect High-Touch Areas Bathrooms have a lot of touched surfaces. How to Clean Your Home Efficiently: Disinfect doorknobs, faucet handles, light switches, and bathroom flush handles. Cleaning regularly will also help to reduce the spread of germs in the home. 9. Move to Bedrooms A bedroom after all, is it not the place you sleep? is typically given a more cursory cleaning than a kitchen or bathroom. Working with the house cleaning order by process, make the bed and put away the personal items first. Dust furniture, clean mirrors, and Windex surfaces before vacuuming or mopping, or use a damp cloth before vacuuming or mopping. 10. Wash Bedding Regularly Sheets, pillowcases, blankets, and comforters collect dust, sweat, and allergens over time. Fresh bedding contributes to a cleaner and healthier sleeping environment. 11. Clean Living Areas The living and family rooms are second active spaces in the home. Dust shelves, electronics, furniture, and knickknacks. Fluff cushions, corral clutter, and wipe surfaces to a clean finish. 12. Vacuum All Floors When you are done dusting and wiping surfaces, vacuum the floors. Clean the floor at the end of your work, always, since dust and dirt are falling while working. Vacuum carpets, rugs, and all corners thoroughly. 13. Mop Hard Floors After you vacuum, mop tile, hardwood, laminate, or vinyl floors. Mopping takes off the last layer of dirt and dust on your floors and makes them look fresh and clean. 14. Empty Trash Bins Throw away the garbage when you have finished cleaning the worst part. A good housecleaning is to pass through the house, collecting the contents of all the wastebaskets on each floor in the kitchen and lining them. Garbage out, smell out, clean house. Deep Cleaning Deep cleaning at home can come with a few extra tasks like cleaning behind appliances, washing walls, scrubbing grout, and organizing storage spaces. If you want to have a healthy and beautiful home, you should deep clean regularly. And don’t forget the outside our roof cleaning services Tracy CA keeps your roof free from moss, algae, and dirt all year round. Conclusion So what is the right order to
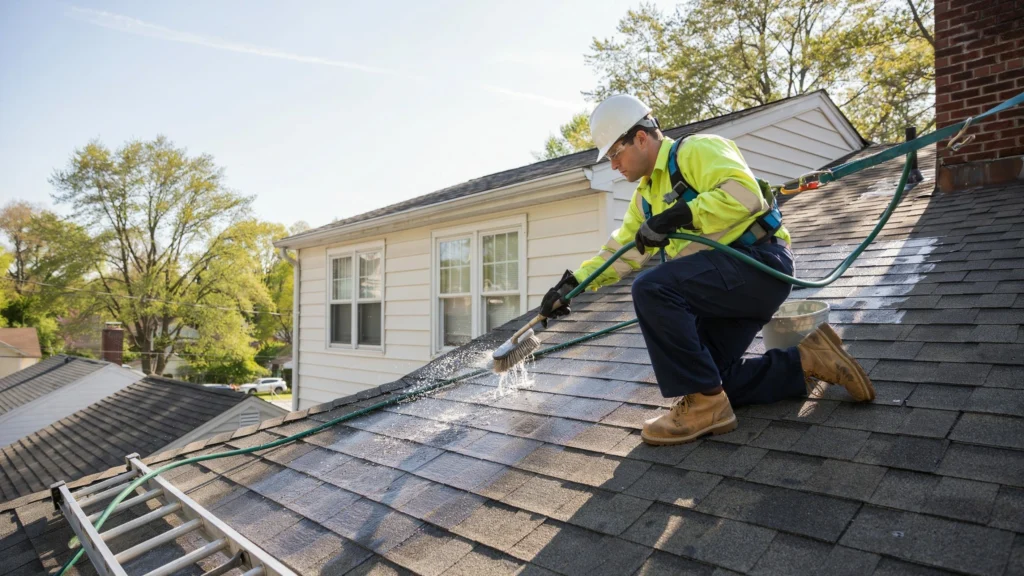
How Do Professionals Clean Roof Tiles? (7 Proven Steps Experts Follow)
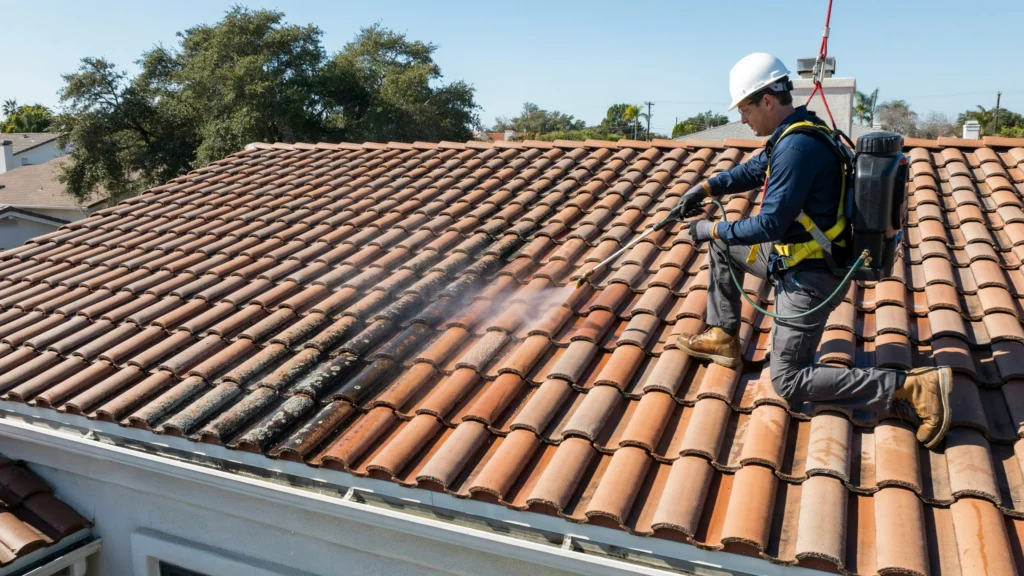
Your roof works hard every single day. Rain, wind, algae, and moss slowly build up on tiles over time. Left alone, that grime can shorten your roof’s life and hurt your home’s value. Cleaning it isn’t just about looks. It’s about protecting a big investment. So how do professionals clean roof tiles? They follow a careful process using the right tools, the right pressure, and the right chemicals without causing damage. This guide breaks it all down for you, step by step. What Causes Roof Tiles to Get Dirty? Before cleaning, it helps to understand what you’re dealing with. Roof tiles face constant exposure to the elements. Several things cause that dark, ugly buildup. Algae and Moss are the most common culprits. Algae thrives in humid, shaded areas and spreads fast. Moss holds moisture against tiles, which can crack them over time. Lichen is trickier. It’s a combination of algae and fungus. It grips tile surfaces tightly and is harder to remove than algae alone. Dirt and debris accumulate from wind, nearby trees, and birds. Leaves rot on the roof and create damp patches that encourage organic growth. Hard Water Stains appear in areas with mineral-rich water. These white or gray streaks are calcium deposits left behind after rain evaporates. Air Pollution leaves a thin film of grime over time. Urban homes deal with this more than rural ones. Understanding the type of dirt matters. Different problems need different solutions. A professional identifies what’s on your roof before starting any work. Why Hire Professionals for Roof Tile Cleaning? You might think a garden hose and some scrubbing will do the job. It won’t not properly, anyway. And doing it wrong can cost you more than hiring someone in the first place. Here’s why professional roof tile cleaning is the smarter choice: Safety First. Roofs are slippery, especially when wet or covered in moss. Professionals use proper harnesses, non-slip boots, and fall protection equipment. Falls from roofs cause serious injuries every year. The Right Equipment. Professionals use commercial-grade tools that you simply can’t rent from a hardware store. They know how much pressure each tile type can handle. No Tile Damage. Too much water pressure cracks tiles, lifts ridge caps, and forces water under the surface. A trained technician knows exactly how to avoid this. Long-Lasting Results. Professionals apply post-treatment biocides that prevent regrowth for years. DIY cleaning usually only removes visible grime without stopping it from coming back. Insurance and Liability. Licensed professionals carry insurance. If anything goes wrong on your property, you’re protected. If you’re in the area and need reliable help, check out our roof cleaning services Tracy CA page. Our team at VJ Pressure Washing handles everything from inspection to final treatment with care and precision. How Professionals Clean Roof Tiles This is the core of what you’re here for. So let’s walk through how professionals clean roof tiles, from the first inspection to the final rinse. Step 1: Roof Inspection Every job starts with a walkthrough. The technician checks for cracked, broken, or loose tiles. They note areas with heavy moss or lichen. They look for damaged flashing and clogged gutters. This matters because cleaning a damaged roof can make problems worse. Cracks let water in. Loose tiles can slide off. A professional won’t start until the roof is safe to work on. Step 2: Protecting the Property Before any water or chemicals touch your roof, the area below is protected. This means: Covering garden beds and plants with tarps Closing windows and doors Moving outdoor furniture away from the work zone Blocking gutters temporarily to control runoff Cleaning solutions can harm plants and stain surfaces. A good crew takes time to prep the site properly. Step 3: Applying Biocidal Treatment On most tile roofs, professionals apply a biocidal cleaning solution first. This is a mix of water and a surfactant-based chemical designed to kill moss, algae, and lichen at the root level. The solution is sprayed evenly across the roof surface and left to dwell. Dwell time depends on how heavy the growth is anywhere from 20 minutes to a few hours. This step does the hard work. The chemical breaks down organic material so it’s easier to remove. Step 4: Soft Washing or Pressure Washing After the treatment dwells, the roof is rinsed. This is where the debate between soft washing and pressure washing comes in (more on that below). Most professionals use low to medium pressure for tile roofs. High pressure can crack tiles, especially older concrete or terracotta ones. The goal is to rinse off the treated grime without putting stress on the surface. The technician works from the ridge (top) downward. This ensures runoff flows naturally with gravity and doesn’t force water under tiles. Step 5: Scrubbing Stubborn Areas For thick moss or lichen that doesn’t rinse away, professionals use long-handled soft bristle brushes. They scrub gently in the direction of the tile’s profile. This loosens material without scratching the surface. Wire brushes are never used. They scratch tile coatings and speed up weathering. Step 6: Gutter Cleaning All that loosened moss and debris ends up in the gutters. A professional job always includes clearing and flushing the gutters after the roof is done. Blocked gutters cause water damage to fascias and foundations. Step 7: Post-Treatment Application This is the step most DIYers skip and it’s the most important one for long-term results. After the roof is clean, a protective biocide or algae inhibitor is applied. This soaks into the tile surface and kills any remaining spores. It also creates a barrier that slows future growth. Quality biocide treatments can keep your roof clean for 2 to 5 years, depending on your local climate and tree coverage. Soft Washing vs. Pressure Washing Roof Tiles These two roof washing techniques are often confused. They’re very different. Soft Washing uses low water pressure (under 500 PSI) combined with a cleaning solution. The chemicals do most of the work. Soft wash roof cleaning
What Are the Advantages of Home Washing?
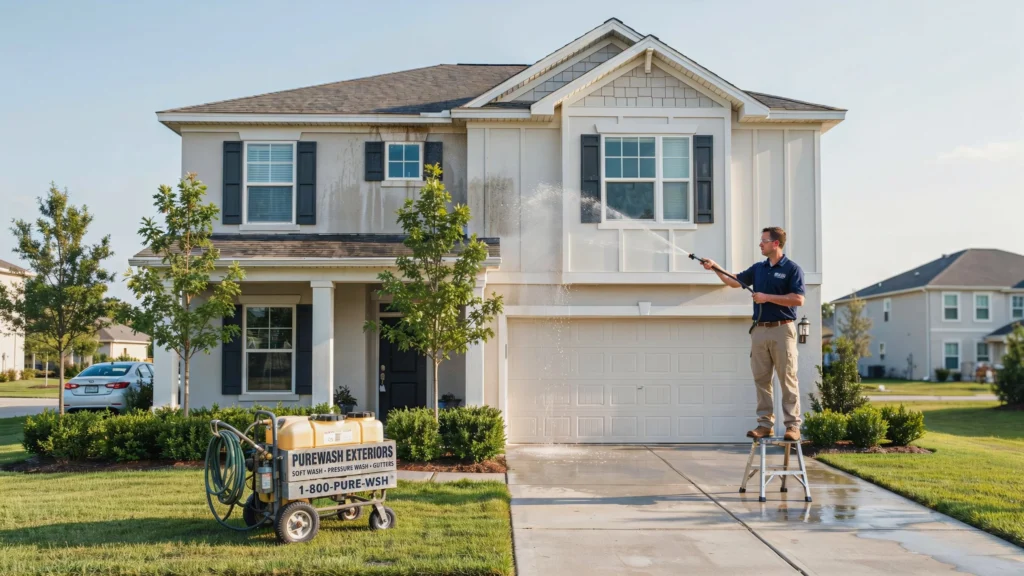
People only think about cleaning inside their home and don’t realize the importance of cleaning outside their home. Over time, dirt, algae, dust, mold, and other contaminants collect on a home’s exterior surfaces, making the house look tired and dingy. Routine home washing is among the best ways to protect and preserve a property. It cleans and brightens, protects exterior surfaces, and promotes a healthier environment. Whether by homeowners or professional exterior house cleaning company services, routine cleaning of your house comes with many benefits you can keep for a long time. Understanding Home Washing Home Washing Service is the professional power washing service of the sides of a house, including its siding, brick, stucco, roof, driveway, patio, and even fence! It is designed to remove dirt, grime, algae, mildew, and other long-stay residents. If left unchecked and untreated, these contaminants can eat away at surfaces and can fade the look and the curb appeal of a house. house washing services Tracy CA is necessary for the beauty and life maintenance of the home. Benefits of House Washing The advantages of house washing are not just cosmetic. A clean exterior helps protect your home’s structure and can extend the lifespan of siding, paint, and other building materials. At VJ Pressure Washing, we help homeowners maintain a cleaner, healthier, and longer-lasting property through professional house washing services. Homeowners can also prevent decay and save on maintenance costs by eliminating harmful deposits. Regular cleaning can also help catch small problems before they become expensive repairs. The Advantages of House Washing: The effects of house washing provide ideal conditions for maintaining the walls of the home free of incompatible dirt and matter that can eat away at wall coverings and Christian home maintenance. When these effects stack up over time, they can cover paint and sealants, making it possible for the dirt to stick around longer and keep out water, which in turn can lead to surface degradation. If you’re thinking of hosing down the home yourself, consider these five advantages of house washing 1. Solar House Washing Although it is an essential part of responsible home maintenance. A house full of life has lots of water, electricity, and air flowing in and out with all the doors and windows open to let in the vectors of nature. The post Advantages of house washing appeared first on Guy & Sons Pressure Washing, Inc. 2. Improve Curb Appeal Instantly One of the greatest advantages of house washing is improving the appearance of your home. It also makes the home look better, as a clean home gives a good first impression. Mud stains, algae streaks, and other stains will cause even the cleanest homes to look tired. The exterior is so pretty and clean after a power washing; I could just eat off it! When they Enhance Curb Appeal, homeowners are increasing the attractiveness of their home to not only visitors and neighbors, but potential buyers as well. 3. Exterior House Cleaning Services Save Time A lot of homeowners prefer professional Exterior house cleaning services as they save time and labour. Cleaning the exterior of a whole home can be tiring and take up a lot of your time. Using the correct equipment and know-how, the pros get the job done. With the help of exterior house cleaning services, you can clean any number of houses and get high-quality cleaning without the hard work and stress. 4. Protect Exterior Surfaces The protection of exterior surfaces from damage is one of the significant benefits of house washing. Dirt, mold, and algae can hold moisture against surfaces, causing them to break down slowly. Siding, brick, wood, and concrete can all be affected by long periods of exposure. Routine cleaning rids these harmful materials from the exterior and keeps exterior materials looking and feeling their best for years. 5. Prevent Mold and Mildew Growth One of the great benefits of home washing is the option to stop mold and mildew growth. Mold and mildew grow in moist areas where soil and organic matter lie. They can diffuse and make ugly stains if you don’t handle them. Regular cleaning contributes to the prevention of mold and mildew growth by eliminating moisture and other sources of fungal development. 6. Create a Healthier Environment Washing your house is part of cleaning up the outdoors. Homeowners When they Prevent Mold And Mildew Growth! They are also decreasing airborne spores on the property. This is good for cleaner air and for more enjoyable outdoor living. Also, a cleaner house exterior means fewer allergens like pollen and dust. 7. Increase Property Value Advantages of house washing are that it helps to maintain and even increase the value of the property. A clean exterior is a sign of good maintenance. Prospective purchasers generally like to look at a clean, well-maintained house rather than one with dirt and stains on it. Routine cleaning maintains the appearance and salability of the real estate. Improve Curb Appeal If you are a homeowner and you would like to sell, Enhance Curb Appeal Prior To Your Listing. The outside is the first impression of the home for the potential buyer. A clean home looks more appealing and welcoming. A home wash is one of the best values under your control to Improve Curb Appeal before selling, according to many real estate agents. Exterior House Cleaning Services Exterior house cleaning services typically produce better results than cleaning by hand. What the pros are and how. They employ advanced tools to get rid of difficult stains. Because of this, Exterior House Cleaning services can bring back the look of your home inside and out more completely and quickly. 1. Extend the Life of Paint Painted surfaces are the happiest when they are lightly and regularly cleaned. House washing has the advantage of cleaning away pollutants that may degrade paint over time. Staining and discoloration are caused by dirt and algae. Paint bonds better to clean surfaces and holds better, so you