
How Solar Panel Guards Protect and Benefit Your Panels
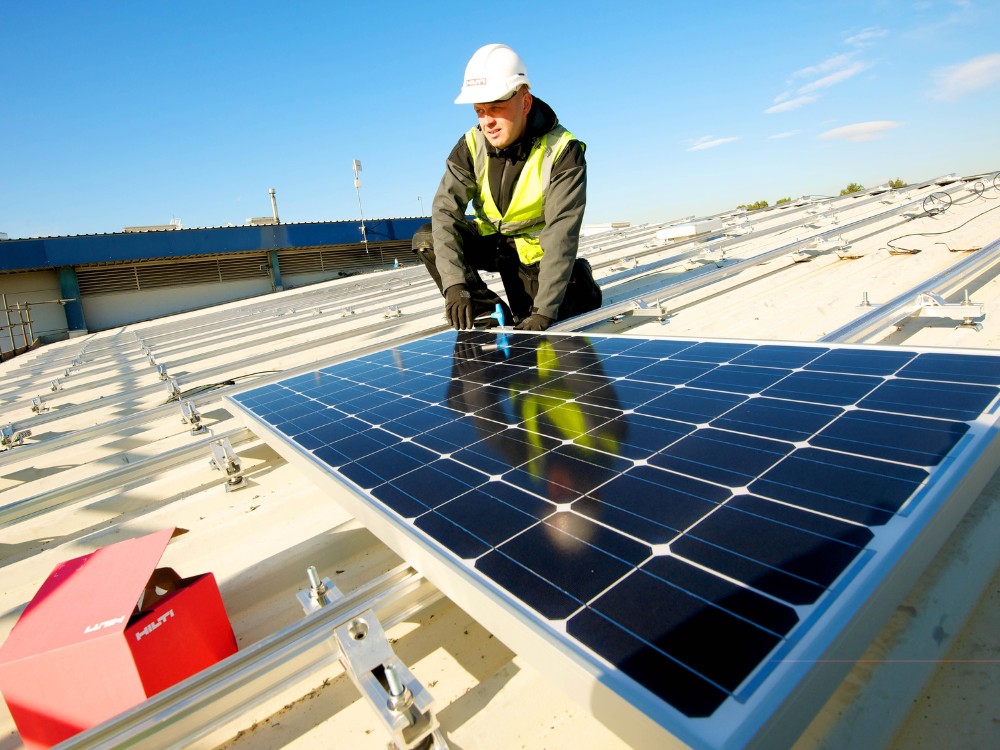
How Solar Panel Guards Protect and Benefit Your Panels Solar panels are a valuable investment in renewable energy, helping homeowners and businesses save on electricity bills while reducing their carbon footprint. However, to keep them working well and lasting longer, they need proper care. One effective way to protect solar panels is by using solar panel guards. This article explains how solar panel guards work, their benefits, and why they are important for keeping your solar energy system in good shape. What Are Solar Panel Guards? Solar panel guards are protective covers or screens placed around solar panels to protect them from various hazards. These guards help prevent damage from physical impacts, weather conditions, and biological growths that could affect the efficiency and durability of solar panels. Solar panel guards come in different forms, such as mesh screens, solid shields, or custom-fit covers. They are usually made from strong materials like aluminum, stainless steel, or durable plastics that can handle tough weather and provide long-lasting protection. How Solar Panel Guards Work Solar panel guards work by creating a barrier around the panels to prevent or reduce damage. Here’s how they provide protection: 1. Protection from Physical Impacts Solar panels are exposed to various physical impacts, such as falling branches, hail, and debris carried by strong winds. These impacts can cause cracks or other damage, reducing the panels’ efficiency and leading to costly repairs. Solar panel guards act as a shield against these impacts. By covering the panels with a protective layer, they absorb and deflect the force of falling objects, lowering the risk of damage. This helps keep the panels intact and ensures they continue to work efficiently 2. Shielding from Harsh Weather Conditions Extreme weather, like heavy rain, snow, and strong winds, can negatively affect solar panels. Rain and snow can lead to dirt, debris, and growths like algae and moss, which block sunlight and reduce the panels’ efficiency. Strong winds can also carry debris that might scratch or damage the panels. Solar panel guards help solve these problems by keeping the panels clean and free from debris. They provide a barrier that stops dirt and growths from building up on the panels, helping them receive the most sunlight and stay efficient, even in bad weather. 3. Preventing Biological Growth Growths like algae, moss, and lichen can thrive on solar panels, especially in damp or shaded areas. These growths not only block sunlight but can also damage the panel’s surface. Over time, this can significantly reduce the panel’s energy output and lifespan. Solar panel guards help prevent biological growth by stopping organic materials from accumulating. With a guard in place, the chance of moss and algae growing on the panels is greatly reduced, keeping the surface clean and functional. 4. Reducing the Risk of Wildlife Damage Birds and small animals can sometimes damage solar panels. Birds may peck at the panels or nest underneath them, while rodents might chew on wires or insulation. This can lead to problems and safety issues. Solar panel guards can also help with this by covering the panels and creating a barrier that keeps animals away. This helps protect the system from potential damage caused by wildlife. Benefits of Solar Panel Guards Installing solar panel guards offers several important benefits: 1. Increased Durability One of the main benefits of solar panel guards is increased durability. By protecting the panels from physical damage, weather problems, and biological growths, guards help extend the life of your solar energy system. This means fewer repairs and replacements, saving you money over time. 2. Enhanced Efficiency The efficiency of solar panels depends on how much sunlight they can absorb. Any damage or blockage can reduce their ability to capture and convert sunlight into energy. Solar panel guards help keep the panels clean and free from debris, so they can perform at their best. 3. Cost Savings While there is an initial cost for installing solar panel guards, the long-term savings can be significant. By preventing damage and reducing maintenance needs, guards help you avoid expensive repairs and replacements. Keeping your panels in good condition also means they operate efficiently, leading to more energy savings. 4. Improved Appearance Solar panel guards can also make your solar energy system look better. By providing a clean and uniform look, guards help your panels blend in with the rest of your roof or building. This can be important if you are concerned about how the panels look on your property. 5. Peace of Mind Knowing that your solar panels are protected gives you peace of mind. With solar panel guards in place, you can be confident that your investment is safe from common issues like physical damage, weather problems, and biological growths. This allows you to enjoy the benefits of solar energy without worrying about potential problems. Conclusion Solar panel guards are important for protecting and benefiting your solar energy system. They shield your panels from physical damage, harsh weather, biological growths, and wildlife, helping your panels stay in excellent condition and work efficiently. With benefits like increased durability, enhanced efficiency, cost savings, improved appearance, and peace of mind, solar panel guards are a smart investment. When choosing guards, consider factors like material durability, fit, and ease of installation to find the best option for your needs.
How to Clean Solar PanelsHow to Clean Solar Panels the Right Way (Step-by-Step Guide)
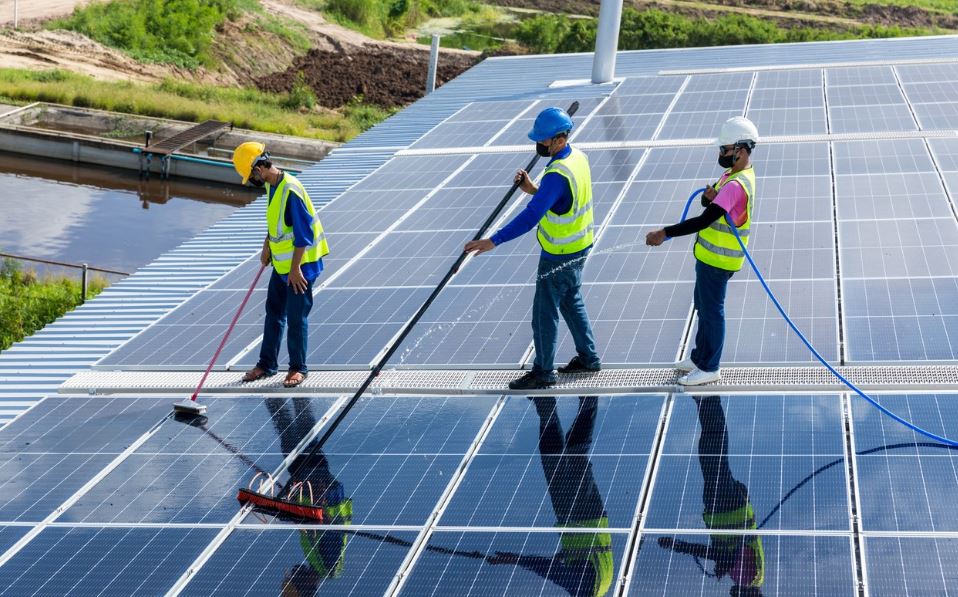
Dirty solar panels lose power. Dust, bird droppings, and pollen block sunlight from reaching the cells. That alone can cut your system’s output by 15% to 25%. You paid good money for solar, so keeping those panels clean is one of the easiest ways to protect your investment. Learning how to clean solar panels doesn’t take much. You need the right tools, the right time of day, and a safe method. This guide covers everything, from basic DIY cleaning to knowing when it’s time to call a pro. Why Cleaning Solar Panels Is Important Solar panels work by turning sunlight into electricity. When a layer of dirt sits on top of the glass, less light gets through. Less light means less power. Here is what buildup does to your system over time: Dust and pollen form a thin film that reduces light absorption. Bird droppings cause “hot spots,” which can permanently damage cells. Leaves and debris block large sections and create uneven shading. Hard water deposits leave mineral stains that get worse if ignored. A clean panel can produce 15% to 25% more energy than a dirty one. In a year, that adds up to real money. Good solar panel maintenance pays for itself. How Often Should You Clean Solar Panels? There’s no single answer. It depends on where you live and what’s around you. General rule: Clean your panels 2 to 4 times a year. But adjust based on your situation: Dusty or dry climates: Every 1 to 2 months. Places like California deserts or areas near farms get heavy dust buildup. Urban areas: Every 2 to 3 months. City pollution and soot coat panels faster than you’d think. Rainy climates: 2 times a year may be enough. Rain handles light dust well. Near trees or birds: Clean more often. Sap and droppings are stubborn. Most solar manufacturers recommend a professional inspection once a year along with regular cleaning. That keeps your warranty intact and your system running well. Signs Your Solar Panels Need Cleaning Your panels often tell you when they’re dirty. You just have to know what to look for. Watch for these signs: Your energy bill goes up but your usage doesn’t change. Your solar monitoring app shows a drop in production. You can visibly see dust, streaks, or bird droppings from the ground. Dark patches or shadows appear on the panels. It hasn’t rained in several weeks. If you notice a sudden drop in power output and live in an area with heavy bird activity or pollen, that’s usually the first clue. Don’t wait for it to get worse. If you’re unsure whether your panels need a basic rinse or a deep clean, a local specialist can assess them quickly. VJ Pressure Washing offers professional solar panel cleaning in Tracy, CA, and can spot damage, buildup, and shading issues most homeowners miss. Getting a professional set of eyes on your system once a year is smart solar panel maintenance. Tools and Supplies Needed to Clean Solar Panels You don’t need anything fancy. Most of what you need is probably already at home. Basic DIY solar panel cleaning kit: Soft-bristle brush or a solar panel cleaning brush (long handle preferred) A garden hose with a gentle spray nozzle A squeegee with a soft rubber edge A bucket of warm water A few drops of mild dish soap (optional, for stubborn grime) Microfiber cloths for drying edges Optional but helpful: Extendable pole so you can reach panels from the ground Deionized water system (removes mineral deposits better than tap water) Safety harness if you must go on the roof Keep everything soft. Solar panel glass is strong but can scratch if you use anything abrasive. What Not to Use on Solar Panels Some cleaning products and tools cause more harm than good. Avoid these: Pressure washers: High-pressure water can crack seals, loosen frames, and void your warranty. This is one of the most common mistakes in DIY solar panel cleaning. Abrasive scrubbers or steel wool: These scratch the anti-reflective coating on the glass. Harsh chemicals or bleach: They degrade the surface over time and leave residue. Tap water in hard water areas: Minerals in tap water leave white spots after drying. Use filtered or deionized water if possible. Detergents with strong fragrances or degreasers: These are too aggressive for panel surfaces. Stick to soft materials and plain water whenever you can. Less is more when it comes to solar panel maintenance. Step-by-Step Guide to Cleaning Solar Panels This is the safest and most effective way to clean your panels without damaging them. At VJ Pressure Washing, we follow this exact process on every job to make sure your panels stay protected and performing at their best. Step 1: Pick the Right Time Clean early in the morning or late in the evening. Panels get very hot during the day. Cold water on a hot panel can cause thermal shock and micro-cracks. Morning is best because dew softens dirt overnight. Step 2: Turn Off Your Solar System Before touching anything, shut down the system using the manufacturer’s shutdown procedure. Check your inverter manual or app for instructions. Safety first. Step 3: Remove Loose Debris First Use a soft dry brush or cloth to sweep off leaves, dust, and loose dirt. Start from the top and work down. Don’t press hard. Step 4: Rinse With Water Use a garden hose in a gentle setting. Rinse from top to bottom. This removes most surface dust without any scrubbing. Step 5: Gently Scrub Stubborn Spots Mix a few drops of mild dish soap in a bucket of warm water. Dip your soft brush and gently scrub any bird droppings or stuck-on grime. Don’t scrub in circles. Use straight strokes. Step 6: Rinse Again Do a final rinse to remove all soap. Soap residue attracts more dirt, so make sure it’s all gone. Step 7: Dry the Edges Use a clean microfiber cloth or squeegee to dry the edges and frame.
How to Install Gutter Guards

Clogged gutters cause real damage. Water overflows, rot sets in, and your foundation suffers. The fix is simpler than most people think. Gutter guards block debris before it builds up, saving you hours of cleaning and hundreds in repair costs. They work on almost every home and most types are made for DIY installation. So if you want to know how to install gutter guards without hiring someone, you’re in the right place. This guide walks you through every step, from picking the right type to finishing the job safely. No experience needed. Types of Gutter Guards Before you buy anything, know what’s out there. Not all gutter guards are equal. The right type depends on your roof, tree coverage, and budget. 1. Mesh Gutter Guards These are the most popular. A fine metal mesh sits over your gutter and blocks leaves, pine needles, and shingle grit. Water flows through easily. They work great in areas with heavy tree coverage. 2. Micro-Mesh Gutter Guards Even finer than standard mesh. These block tiny debris like seed pods and roof sand. They cost more but offer the best performance in most climates. 3. Reverse Curve (Surface Tension) Guards Water clings to the curved surface and drops into the gutter. Leaves fall off the edge. These are effective but can be tricky to install correctly. 4. Foam Gutter Guards Foam inserts sit inside the gutter. Water soaks through. Debris sits on top and dries out. Easy to install, but foam can harbor mold and algae over time. 5. Brush Gutter Guards Cylindrical brushes fit inside gutters. Leaves rest on top and blow away. Simple to put in but require frequent cleaning of the brushes themselves. 6. Screen Gutter Guards Flat screens that snap over gutters. Very affordable and easy to install. Best for areas with large leaf debris, not pine needles. Quick Tip: If you have large trees near your roof, go with a micro-mesh. If your area gets mostly large leaves, basic screen guards work fine. Tools and Materials Needed You don’t need a lot of gear. Here’s what to gather before you start: Tools: Ladder (extension ladder or step ladder depending on roof height) Tape measure Tin snips or utility knife Work gloves Safety glasses Drill (for screw-on guard types) Garden hose (for testing water flow) Materials: Gutter guards (enough to cover your total gutter length measure first) Screws or clips (often included with the guards) Caulk or gutter sealant (for any leaky joints found during prep) Gutter spikes or hangers (if your gutters need resetting) How Much to Buy: Measure the total linear footage of all your gutters. Add 10% for cuts and overlap. Most gutter guard panels come in 4-foot sections. Preparation Before Installation Skipping prep is the number one reason gutter guard installation fails. Take your time here. Step 1: Clean the Gutters First This is non-negotiable. Any debris left inside will clog your new guards from below. Use a gutter scoop or your gloved hands to clear everything out. Flush with a garden hose. Check that water flows freely to the downspout. Step 2: Inspect for Damage Look for sagging gutters, rust spots, separated joints, or loose hangers. Fix all of these before installing guards. Guards installed on damaged gutters will fail fast. Step 3: Check Gutter Pitch Water needs to slope toward the downspout. The correct pitch is about 1/4 inch of drop for every 10 feet of gutter. Use a level to check. Re-hang any sections that are sagging or pitched the wrong way. Step 4: Seal Any Leaks Apply gutter sealant to any joints or seams that drip. Let it cure fully before moving to installation. Thinking about skipping all this and just having someone do it right? If you’re in Northern California, check out the best gutter guard installers in Tracy, CA at VJ Pressure Washing. They handle cleaning, inspection, and full gutter guard installation in one visit. Step-by-Step Installation Process This is the core of how to install gutter guards. Follow each step in order. Step 1: Measure and Cut Your Guards Lay your first gutter guard panel next to the gutter section you’re starting with. Use tin snips or a utility knife to cut it to length. Always wear gloves — cut metal edges are sharp. For corners, miter-cut the panels at 45 degrees so they meet cleanly. Step 2: Position the First Panel Slide one edge of the guard under the first row of roof shingles. This tucks the guard in place and creates a solid anchor point. Don’t lift or bend shingles aggressively — just slide under them gently. Step 3: Clip or Screw Into Place Most guards clip onto the outer lip of the gutter. Press down firmly until you hear or feel the clip snap. For screw-type guards, pre-drill pilot holes and fasten with the included screws. Don’t overtighten — you can crack plastic guards. Step 4: Continue Down the Gutter Work from one end to the other. Overlap each panel slightly — about half an inch — to prevent gaps. Gaps let debris in and defeat the purpose of the guard. Step 5: Handle Downspout Areas When you reach a downspout opening, cut your panel to stop just before it. Don’t cover the downspout entry. Water needs a clear path to drain. Some systems include a specific downspout cover — install it per the manufacturer’s instructions. Step 6: Check Your Work Walk along the roofline and press on each panel. It should feel solid, not wobbly. Check that no panels are sticking up higher than the roofline — this can cause water to overshoot the gutter in heavy rain. Step 7: Test With Water Use a garden hose to run water along the full length of the gutter. Watch for overflow, pooling on top of the guards, or water escaping at joints. Adjust any problem panels immediately. How to Install Gutter Guards on Different Gutter Types Not all gutters are the same. Here’s a quick
How to Pressure Wash a Driveway?
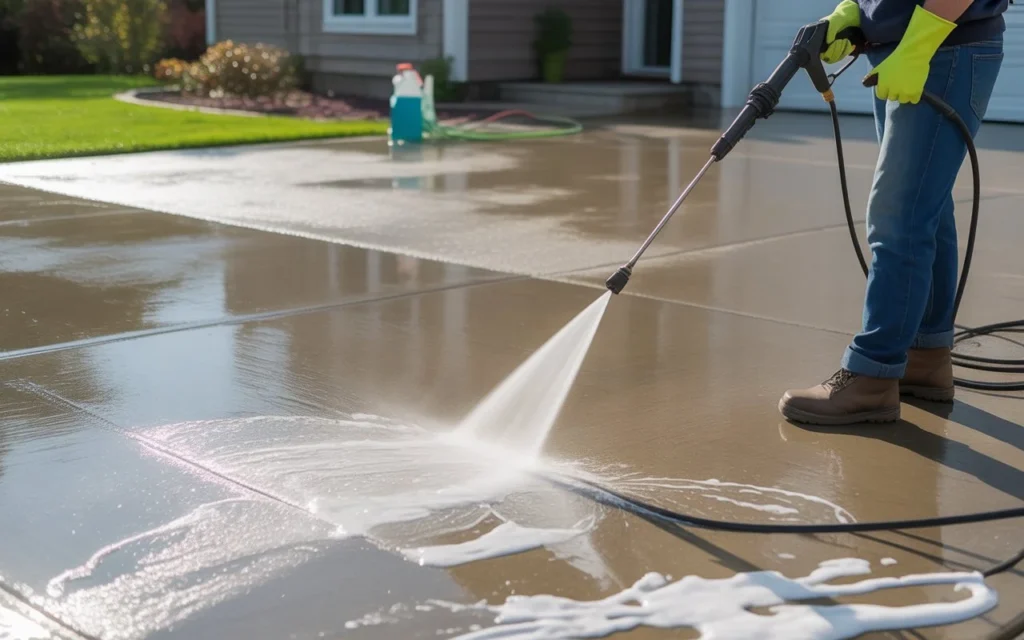
A clean driveway does more than improve curb appeal; it protects your home and prevents long-term damage. Dirt, oil, algae, and moss can degrade surfaces over time. Regular maintenance keeps your driveway safe, attractive, and functional. How to Pressure Wash a Driveway? is simpler than many think. With the right tools, techniques, and safety measures, you can remove stubborn stains, restore your driveway’s appearance, and extend its lifespan. Whether you tackle it yourself or hire professionals, this guide provides practical, step-by-step advice to get the job done efficiently. Why Pressure Washing Your Driveway Matters Driveway cleaning goes beyond appearance. Over time, dirt, algae, and oil create slippery, unsafe surfaces and can erode concrete, asphalt, or pavers. Pressure washing removes grime, prevents damage, and improves longevity. A well-maintained surface also enhances curb appeal and home value. For homeowners seeking professional help, services like driveway washing service tracy ca by VJ Pressure Washing offer safe and effective solutions. Experts use the right pressure and detergents to remove tough stains while protecting your driveway from damage, saving you time and effort. Tools and Equipment Needed To pressure wash your driveway effectively, gather these essentials: A pressure washer suitable for your surface type Cleaning solutions or degreasers for oil, rust, or algae stains Brushes or brooms for scrubbing stubborn spots A garden hose power washer can be used for lighter cleaning Protective gear such as gloves, goggles, and boots Having the right equipment ensures safety and efficiency while achieving a pressure washed driveway that looks clean and refreshed. Step-by-Step Guide to Pressure Washing a Driveway Step 1 – Preparation Remove all vehicles, furniture, and debris from the driveway. Protect nearby landscaping, walls, and plants from water and cleaning solutions. A clear surface prevents accidents and allows thorough cleaning. Step 2 – Pre-Treat Stains Apply appropriate cleaning solutions to tough stains like oil, grease, or rust. Let the product sit for 5–10 minutes to break down grime. Pre-treatment ensures the pressure washer can remove stains more easily. Step 3 – Set Up Your Pressure Washer Choose the correct nozzle and PSI for your surface. Concrete can handle higher pressure, while asphalt needs gentler settings. Test a small section first. Maintain a safe distance to avoid damaging the driveway. Step 4 – Pressure Washing Work in sections for even coverage. Move the nozzle consistently in sweeping motions. Focus on stubborn stains while avoiding prolonged pressure in one spot. This method ensures the best results for pressure wash driveway projects. Step 5 – Rinse and Inspect Thoroughly rinse the driveway to remove all cleaning solution and debris. Inspect for remaining stains. Repeat washing or scrubbing if necessary. Allow the driveway to dry completely before use. DIY vs Professional Pressure Washing DIY driveway cleaning saves money but carries risks. Improper technique, incorrect pressure, or harsh chemicals can damage surfaces or cause injury. Small driveways and light stains may be suitable for DIY work. Hiring professional driveway cleaning services like VJ Pressure Washing ensures safe, thorough results. Experts use proper tools, detergents, and techniques for a pressure washed driveway that lasts longer and avoids accidental damage. Professionals also save time and effort, especially for large or heavily stained driveways. Tips for Maintaining a Clean Driveway Regular upkeep reduces cleaning frequency and preserves your driveway: Sweep regularly to remove dirt and debris Seal driveway surfaces annually to prevent staining Address spills and stains immediately Trim overhanging branches to limit leaf and moss buildup Schedule periodic professional cleaning for a deep refresh Safety Precautions Pressure washing can be hazardous if done incorrectly: Wear gloves, goggles, and boots Keep children and pets away from the work area Avoid excessive pressure to prevent surface damage Follow manufacturer instructions for all equipment and cleaning products Following safety measures ensures an effective and accident-free cleaning process. Cost Considerations The cost of pressure washing varies by driveway size, surface type, and stain severity. DIY costs are limited to equipment and cleaning solutions. Professional services like VJ Pressure Washing are higher upfront but provide efficient, thorough results and prevent costly mistakes. Investing in professional cleaning can save money in the long term by avoiding damage and extending the life of your driveway. Conclusion How to Pressure Wash a Driveway? requires the right approach, tools, and care. Whether you choose DIY methods or hire VJ Pressure Washing for professional service, the goal is a safe, clean, and long-lasting driveway. Regular maintenance keeps your driveway looking its best, prevents damage, and improves home curb appeal. For tough stains or large surfaces, contacting professionals ensures the most effective results. Contact us today at VJ Pressure Washing to schedule expert driveway cleaning services and restore your driveway to pristine condition. FAQs How often should I pressure wash my driveway?Most driveways benefit from pressure washing once or twice a year. However, if you notice stains from oil, algae, or dirt buildup, it’s best to clean sooner. Regular cleaning prevents long-term damage and keeps your driveway looking fresh. What is the best way to pressure wash a driveway?Start by selecting the correct PSI for your driveway surface. Work in small sections, pre-treat stubborn stains with a suitable cleaner, and use a consistent sweeping motion. Finish by thoroughly rinsing the driveway to remove all debris and cleaning solution. Can pressure washing damage my driveway?Yes, improper pressure or incorrect technique can damage surfaces, especially asphalt or older concrete. Using a professional ensures the right pressure, distance, and tools are applied, minimizing the risk of cracks or erosion. Are professional services worth it?Absolutely. Professionals save time, ensure even and deep cleaning, and prevent accidental damage. They also have the expertise and equipment to handle tough stains that DIY methods may struggle with. Can a garden hose power washer be used instead?Yes, for light cleaning or minor dirt and debris, a garden hose power washer can help. However, it is less effective on tough stains like oil, rust, or algae, which usually require a higher-pressure solution.
What is Soft Washing? Understanding the Hidden Gem
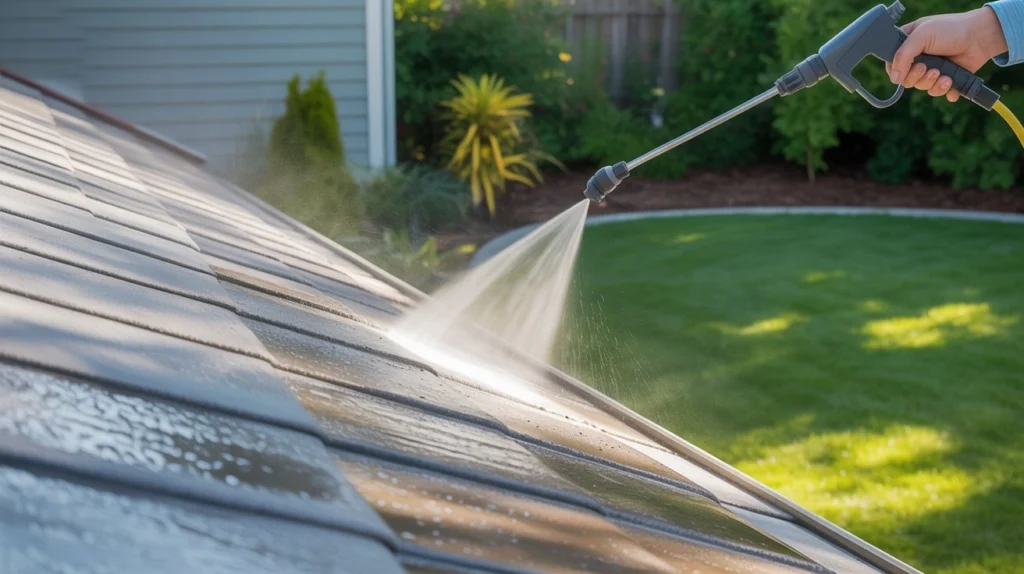
Your home’s exterior collects dirt, mold, algae, and grime over time. Regular garden hoses do not cut it. And plain pressure washing can crack siding, strip paint, or damage roof shingles. There is a better way to clean the outside of your home without causing harm. What is soft washing? It is a low-pressure cleaning method that uses water mixed with cleaning solutions to safely remove biological growth and stains from exterior surfaces. It cleans deeper than a hose and gentler than a pressure washer. What Is Soft Washing? Soft washing uses water pressure below 500 PSI far lower than a standard pressure washer, which runs between 1,500 and 4,000 PSI. The real work is done by the cleaning solution, not the water force. The solution typically contains: A surfactant (helps the solution cling to surfaces) Sodium hypochlorite (kills mold, algae, bacteria, and mildew at the root) Water (to dilute and rinse) This mix is applied to the surface, left to dwell for several minutes, and then rinsed off with low-pressure water. The result is a deep, lasting clean without physical damage to the surface. If you need soft exterior house washing Tracy CA, VJ Pressure Washing uses professional-grade solutions and equipment built for residential surfaces of all types. The Science Behind Soft Washing Understanding the science behind soft washing helps explain why it works so well. Mold, algae, mildew, and lichen are living organisms. They attach to surfaces and reproduce. Pressure washing blasts them off physically, but it does not kill the spores. Those spores stay behind and regrow within weeks. Soft washing uses sodium hypochlorite (similar to bleach but applied in controlled concentrations) to kill these organisms at the cellular level. When the solution contacts algae or mold, it breaks down the cell membrane. The organism dies completely. It cannot regrow from dead cells. This is why soft-washed surfaces stay clean longer. Pressure-washed surfaces often look dirty again in 30 to 60 days. Soft-washed surfaces typically stay clean for 1 to 3 years. The surfactant also plays a key role. It acts like dish soap. It reduces surface tension so the solution spreads evenly and penetrates into pores and cracks where organisms hide. Soft Washing vs. Pressure Washing People often use these terms as if they mean the same thing. They do not. Here is a clear breakdown: Feature Soft Washing Pressure Washing Water Pressure Under 500 PSI 1,500 – 4,000 PSI Cleaning Agent Yes (chemical solution) Sometimes Best For Roofs, siding, wood, painted surfaces Concrete, driveways, patios Risk of Damage Very low Higher on delicate surfaces How Long Results Last 1 – 3 years A few months Use soft washing for: Roof shingles Vinyl, wood, or fiber cement siding Painted surfaces Fences and decks (with care) Stucco and EIFS (synthetic stucco) Use pressure washing for: Concrete driveways and sidewalks Brick pavers Garage floors Unsealed stone surfaces Many professionals use both methods on the same property. The approach depends entirely on the surface. Benefits of Soft Washing There are real, practical reasons why soft washing has become the preferred method for exterior home cleaning. It protects your surfaces. High pressure can crack mortar, chip paint, lift shingles, and force water under siding. Low-pressure soft washing eliminates that risk entirely. It kills what causes the staining. Algae, mold, and mildew are the main causes of dark streaks, green patches, and black discoloration on home exteriors. Soft washing kills them instead of just moving them around. Results last much longer. Because the organisms are dead, not just dislodged, they cannot grow back immediately. Most homeowners see clean surfaces for 1 to 3 years after a single soft wash. It is safer for landscaping. Runoff from soft washing is diluted and manageable. A professional will also pre-wet your plants and rinse them after to prevent any solution from sitting on leaves. It extends the life of your home’s exterior. Mold and algae are not just cosmetic problems. Over time, they break down roofing materials, wood, and siding. Removing them regularly extends the life of those surfaces and saves you money on repairs. Common Problems Soft Washing Removes Soft washing handles a wide range of exterior problems that pressure washing often cannot fully address: Algae (Gloeocapsa Magma): The most common cause of black streaks on roofs. This blue-green algae spreads through airborne spores. Soft washing kills it completely. Mold and mildew: Common on shaded or north-facing surfaces. They appear as green, gray, or black patches. The cleaning solution kills them at the root. Lichen: A tough combination of fungus and algae that bonds tightly to surfaces. It is very difficult to remove with pressure alone. Chemical treatment breaks the bond. Moss: Often found on older roofs and shaded decks. Moss holds moisture, which accelerates deterioration. Soft washing removes and kills it. Dirt and pollution staining: Traffic exhaust, dust, and airborne particles settle on siding over time. The surfactant in soft wash solutions lifts this type of grime effectively. Oxidation on vinyl siding: The dull, chalky look on older vinyl often responds well to soft washing with the right cleaning agents. What Is Soft Washing a House? (How the Process Works) If you are wondering what is softwashing a house step by step, here is exactly how it goes: Pre-inspection: The technician checks the surface type, staining level, and any areas that need extra care. Plant and surface protection: Nearby plants, outdoor furniture, and fixtures get rinsed or covered as needed. Solution application: The soft wash mix is applied using low-pressure spray equipment, starting from the bottom and working up to avoid streaking. Dwell time: The solution sits on the surface for 5 to 15 minutes. This is when it does most of its work. Rinse: A low-pressure rinse removes the solution and dead biological matter from the surface. Post-rinse of plants: Any nearby plants are rinsed again to wash away any runoff. The full process for an average home takes 2 to 4 hours. DIY Soft Washing vs. Hiring a Professional